

Template editor
A template is the email Frontmail renders and sends: subject, recipients, HTML and text body, plus a schema of the parameters your form or code fills in. This page walks through the template list and every part of the editor. For the concepts behind it, see HTML templates, Handlebars and Parameters and types.
Creating and editing templates needs the Owner, Admin or Developer role. Viewers and billing members open templates Read-only – they can look at everything and use Export (.json), but not change or send.
The template list
Section titled “The template list”Open Templates in the sidebar.
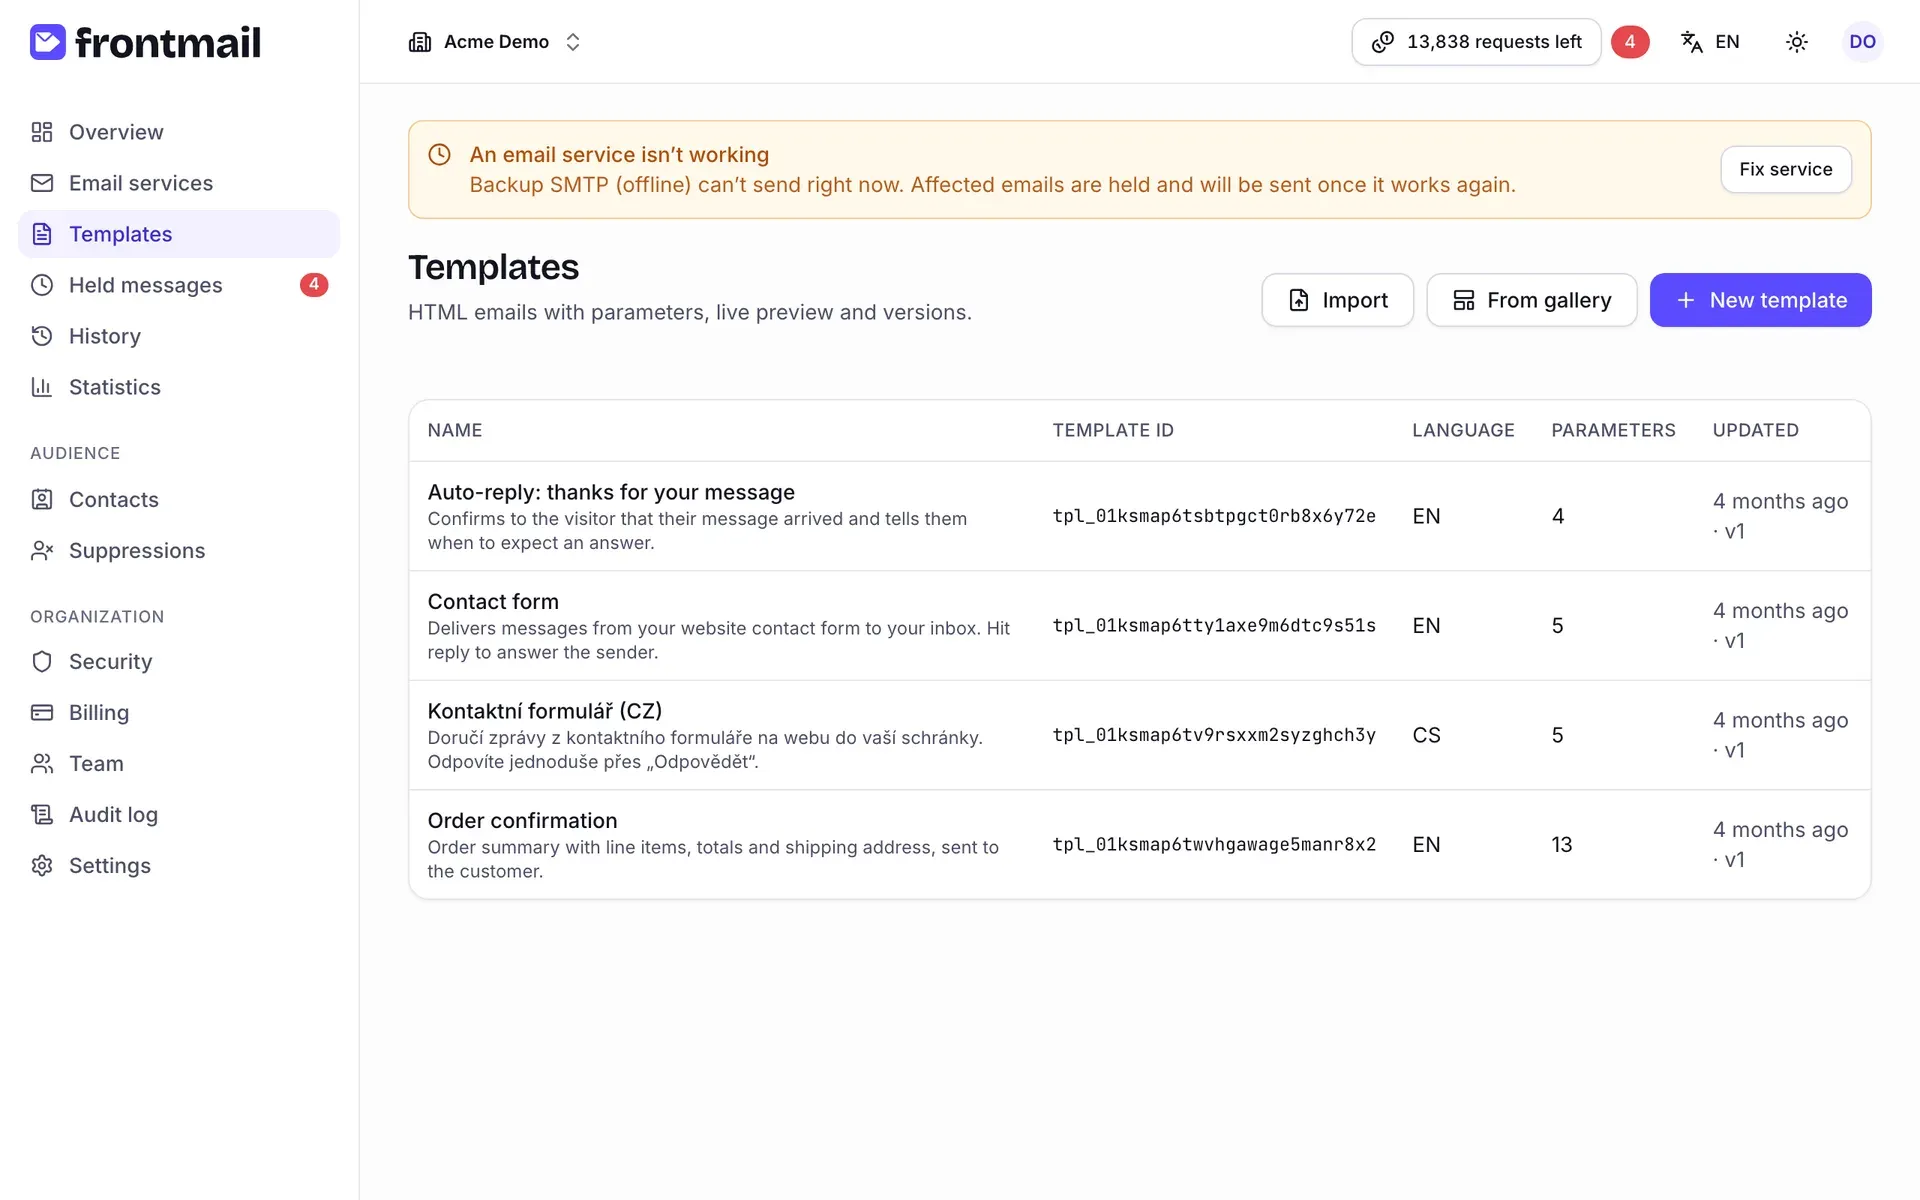
Each row shows the Name (with the description underneath), the Template ID (tpl_…,
needed in your code), the Language, the number of Parameters and when it was Updated,
with the current version (e.g. 2 hours ago · v3).
Template limit and frozen templates
Section titled “Template limit and frozen templates”The number of templates depends on your plan – Free 3, Starter 10, Pro and Business unlimited. When you reach the limit, the list says You’re using 3 of 3 templates on your plan. and the buttons for new templates are disabled. Owners and billing members get an Upgrade button right there.
After a downgrade, templates over the new limit are Frozen (the least recently updated ones). A frozen template keeps its content and versions, but sending with it fails until you upgrade again. See Plan changes.
How to create a template
Section titled “How to create a template”There are three buttons above the list.
New template (from scratch)
Section titled “New template (from scratch)”- Click New template.
- Enter a Name and choose the Language (English or Čeština).
- Click Create.
The new template starts as a simple contact-form email: parameters name, email and message,
To set to your own address and Reply-To set to {{email}}. The CAPTCHA is required if your
organization has added its Turnstile keys,
otherwise it starts off. Adjust it to your needs.
From gallery
Section titled “From gallery”- Click From gallery.
- Switch between English and Čeština in the top right and filter by Category (Forms, Business, Booking, E-commerce, …).
- Click Preview to see a template in full size.
- Click Use template. A copy is created in your organization and opens in the editor.
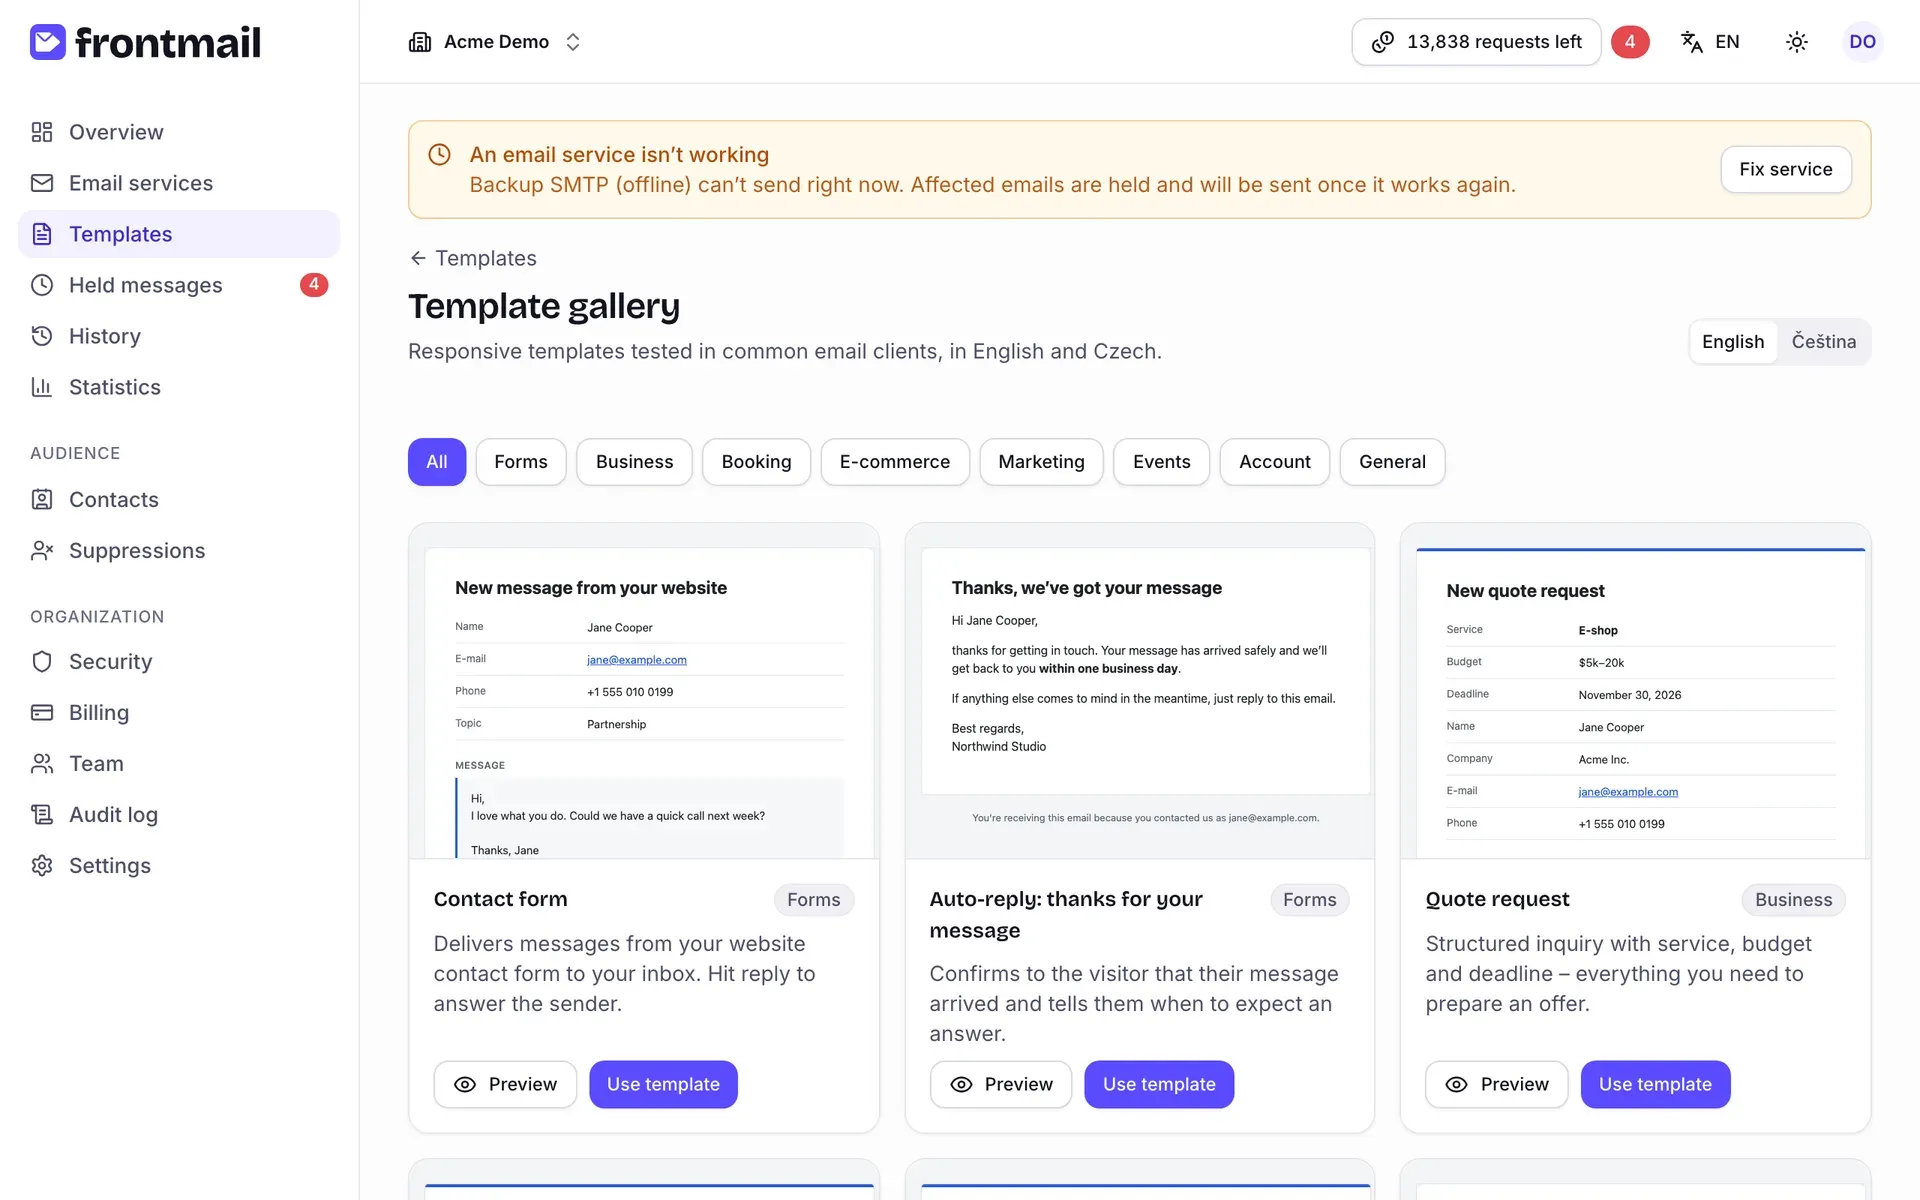
Gallery templates are responsive, support dark mode and come with sample data. See Template gallery.
Import
Section titled “Import”- Click Import.
- Either choose a File – an
.htmlfile or a template exported from Frontmail (.json) – or paste HTML into Or paste HTML. Files can be up to 2 MB. - Check the Name and click Import.
A .json export brings the content, parameters and most settings with it. The service, fallback
service and auto-reply template are not part of the export, so set them again under Settings.
After importing plain HTML, open Parameters and click Detect from template.
The editor at a glance
Section titled “The editor at a glance”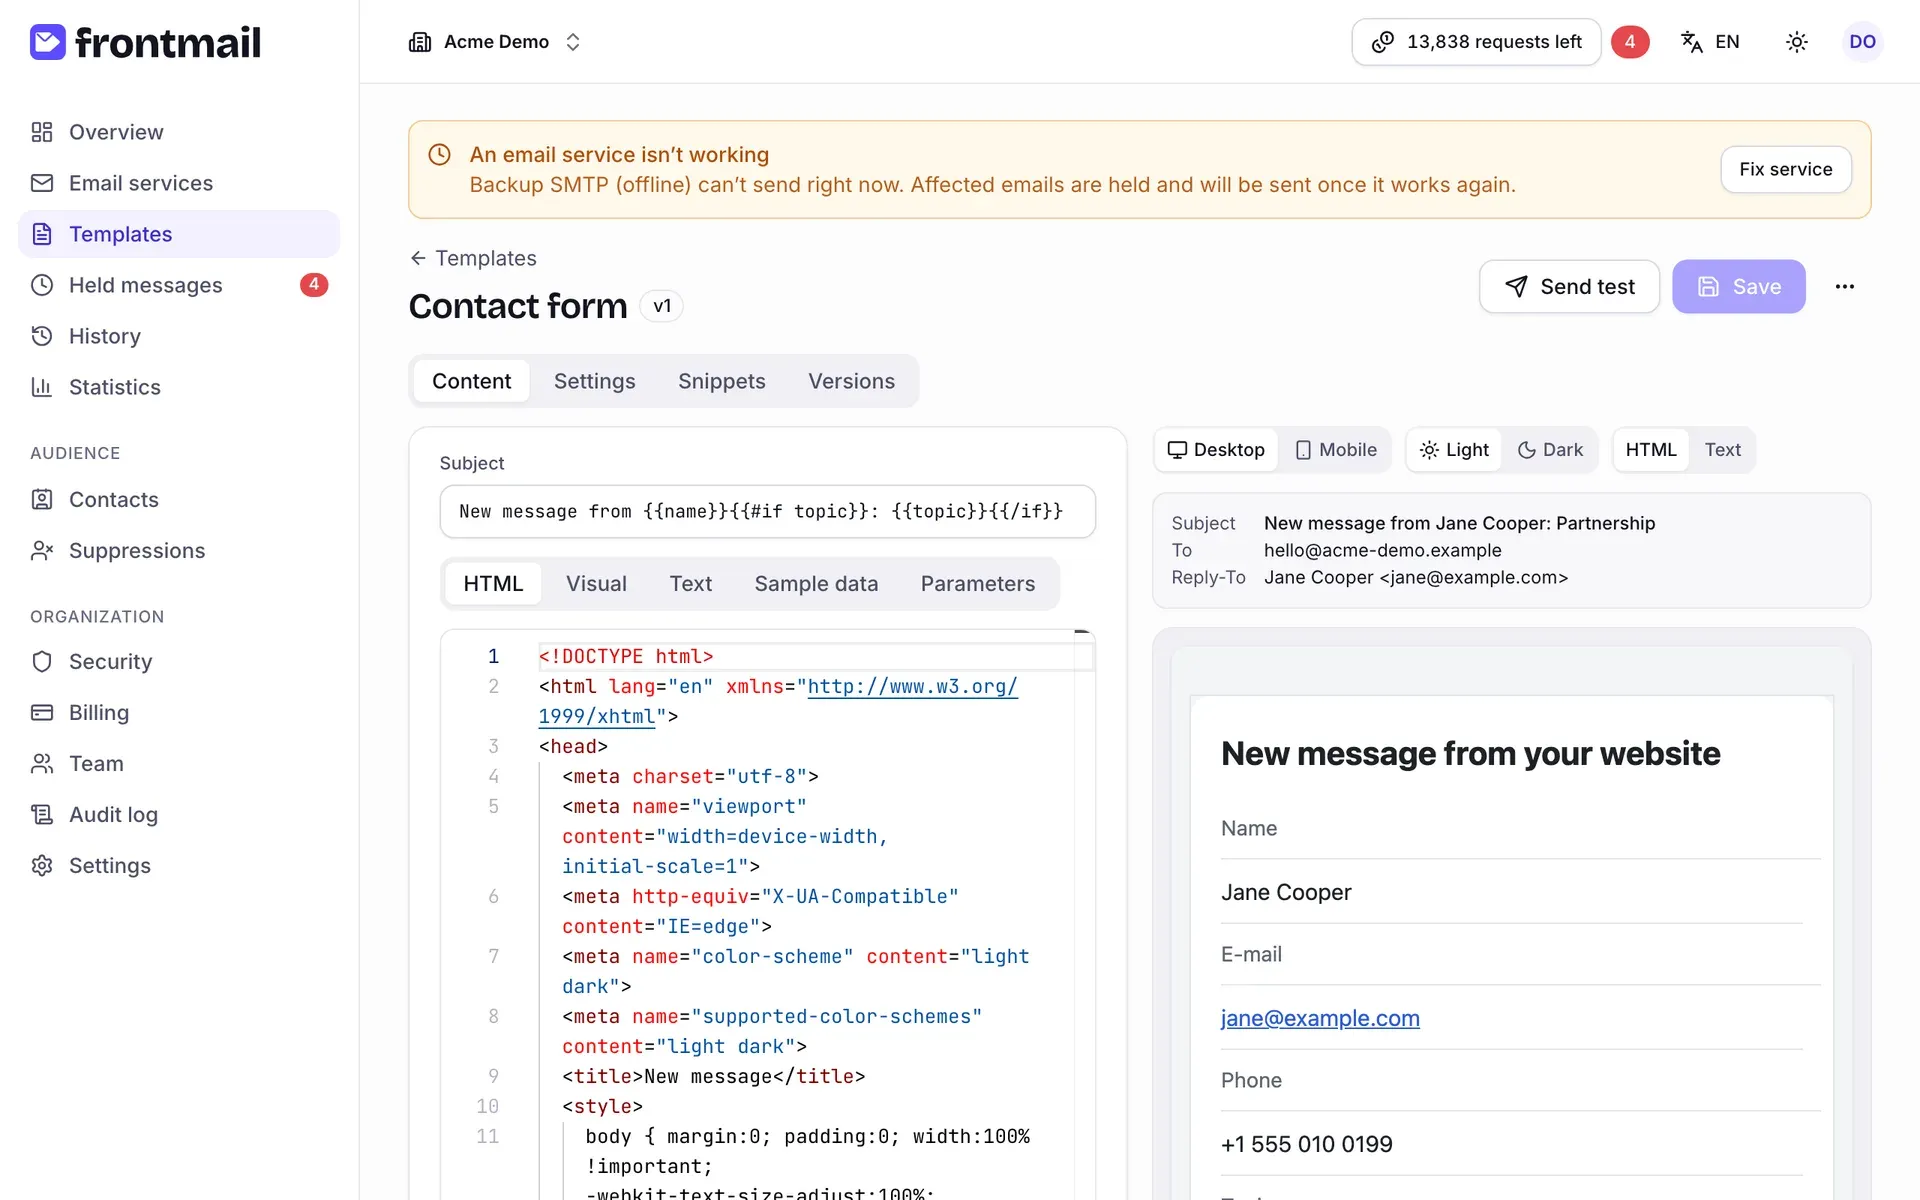
The header shows the template name, its version (e.g. v3) and badges: Unsaved changes while you have edits, Frozen and Read-only where they apply. On the right:
- Send test – see Test emails,
- Save – see Saving,
- More actions (⋯) – Export (.json), Replace HTML and Delete.
Below are four tabs: Content, Settings, Snippets and Versions.
Content
Section titled “Content”On the left you edit, on the right you see the live preview and the checks. The Subject field sits at the top; below it are five sub-tabs.
A full code editor for the HTML body with Handlebars highlighting. Type {{ to get suggestions
for your parameters, helpers such as #if and #each, and system variables. See the
Handlebars guide.
Visual
Section titled “Visual”A simple rich-text editor for templates that are mostly text: Bold, Italic, Heading 1,
Heading 2, lists, Quote, Link, Undo/Redo and Insert parameter. It edits only
the content of <body>; the head and styles stay as they are.
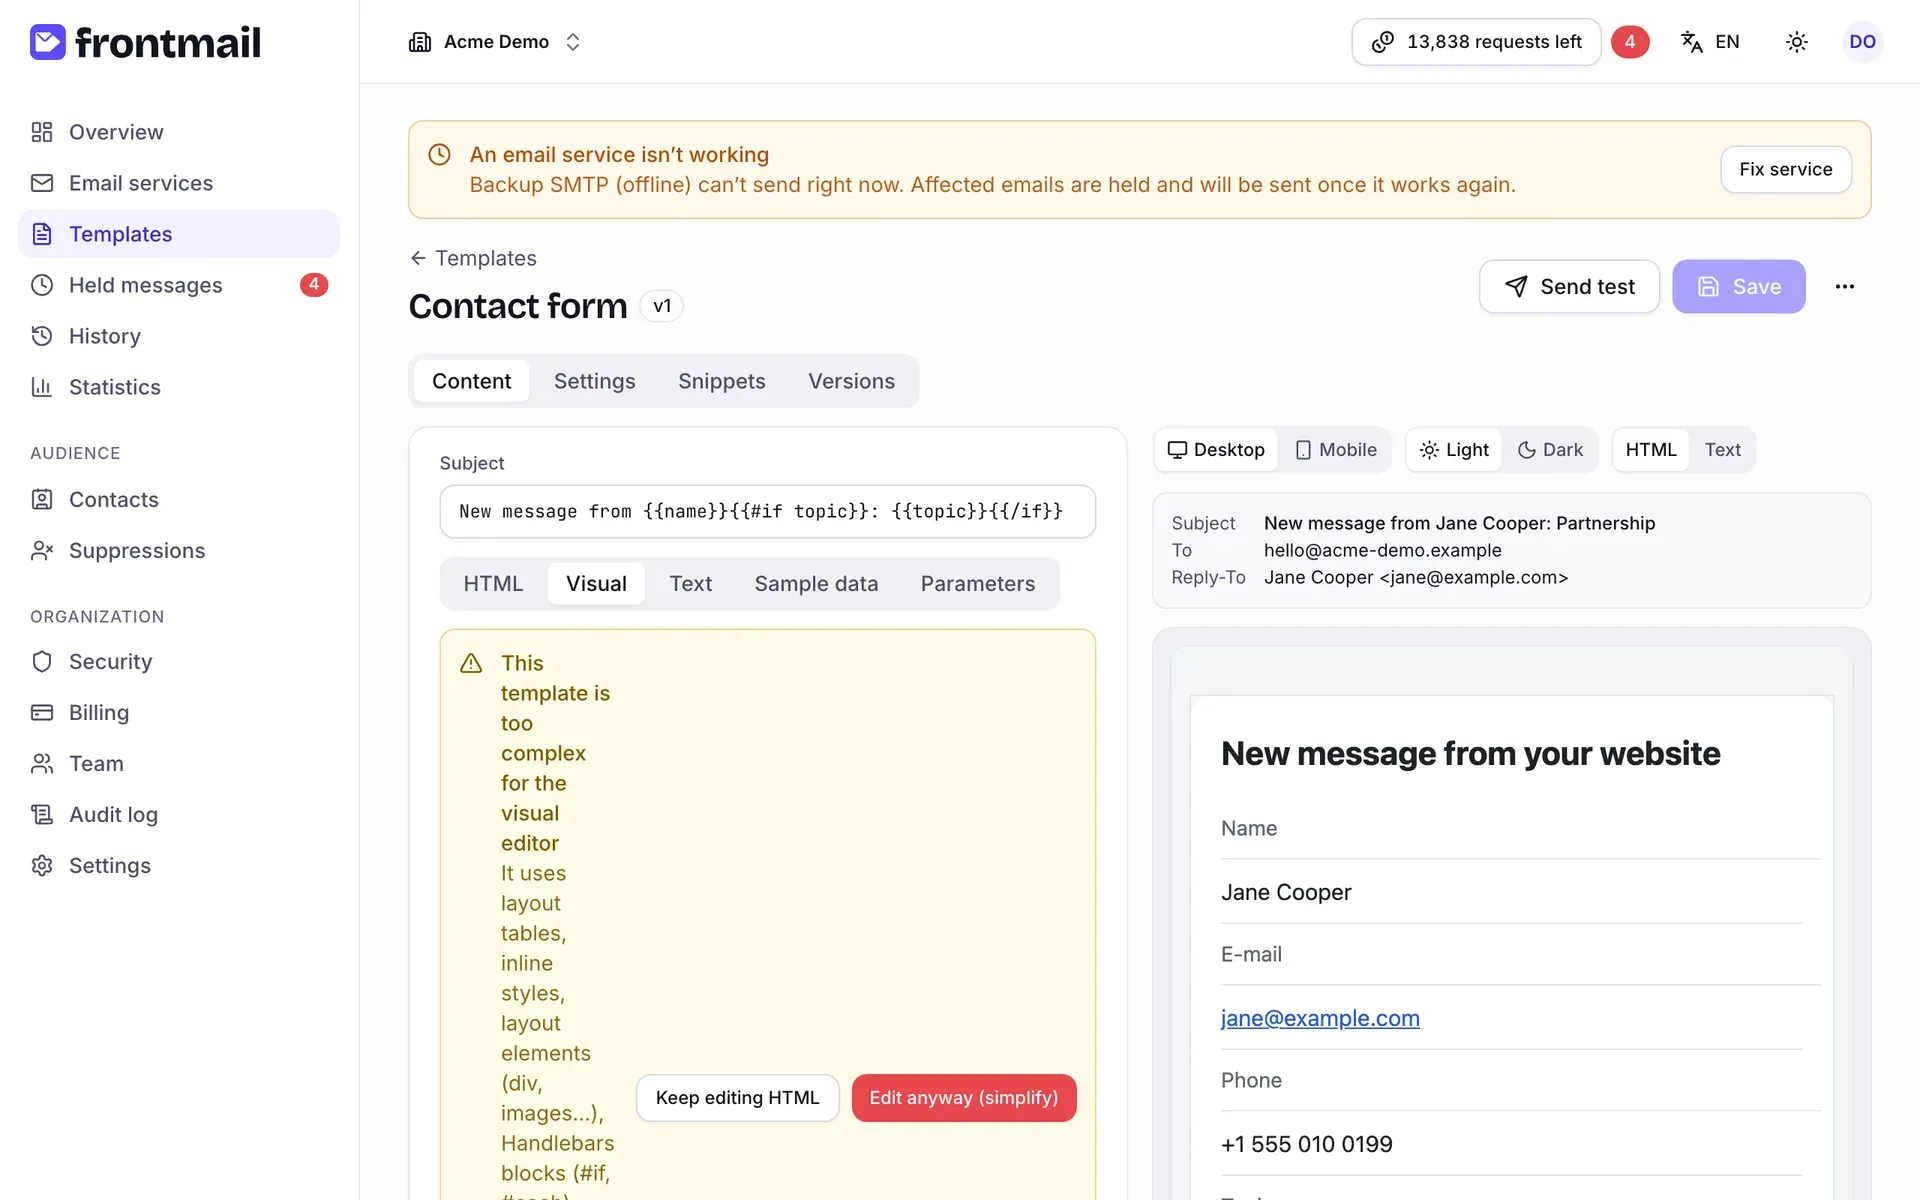
Many templates are too rich for it. If the HTML uses layout tables, inline styles, divs or
images, Handlebars blocks (#if, #each) or CSS classes, you see This template is too complex
for the visual editor with the reasons. You can:
- Keep editing HTML – switch back to the code editor (recommended),
- Edit anyway (simplify) – open the visual editor; saving from it drops the layout and keeps only simple formatting.
The plain-text version sent alongside the HTML. By default it’s generated from the HTML automatically (The text version is generated from the HTML automatically.). Click Write it myself to edit it by hand – the current generated text is used as a starting point. You can turn automatic generation back on in Settings → Message → Generate text version automatically.
Sample data
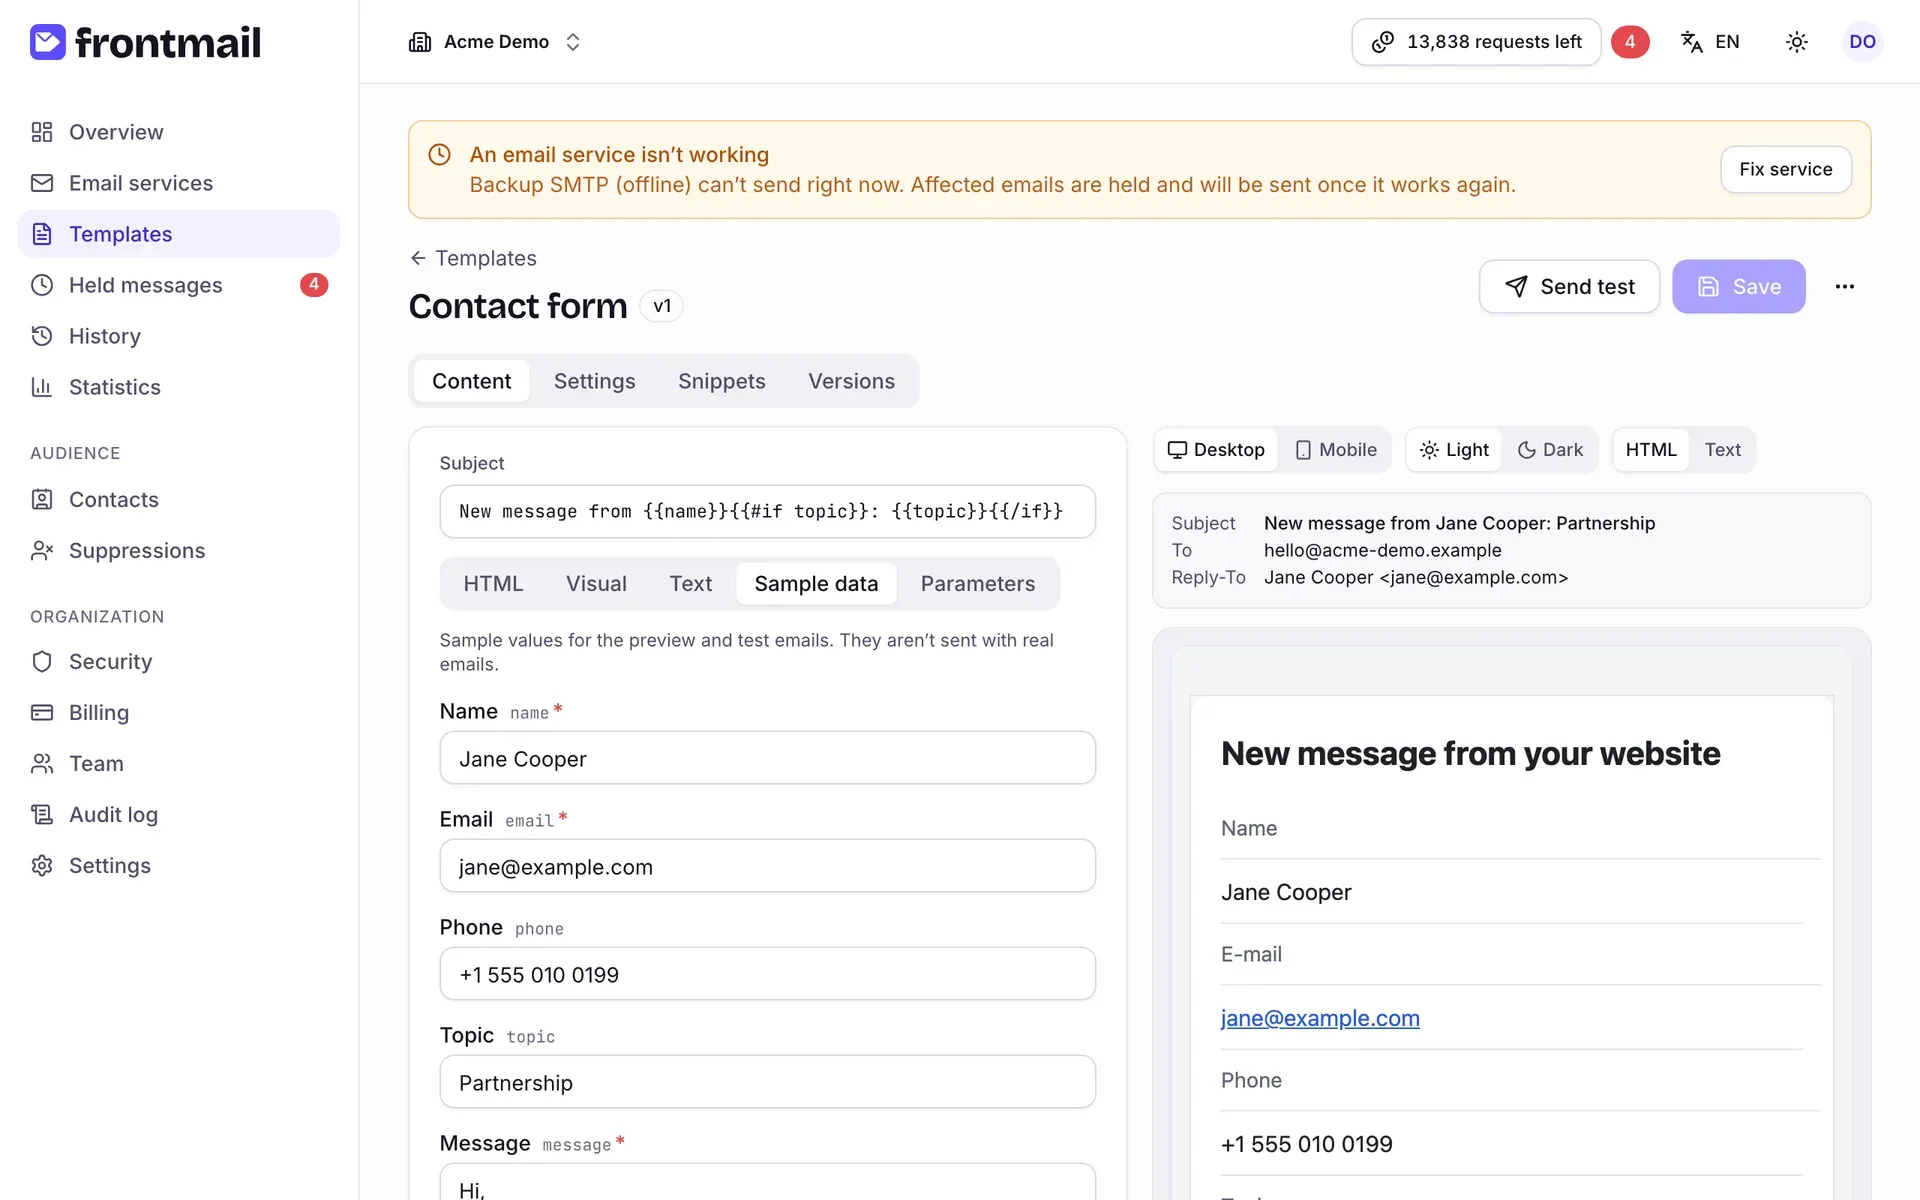
Section titled “Sample data”A form generated from your parameters. The values are used for the preview and for test emails – they’re never sent with real emails. Lists have Add item, Move up, Move down and Remove item. If a value breaks a rule (too long, wrong type, missing required value), the field shows the error, just like the API would.
Parameters
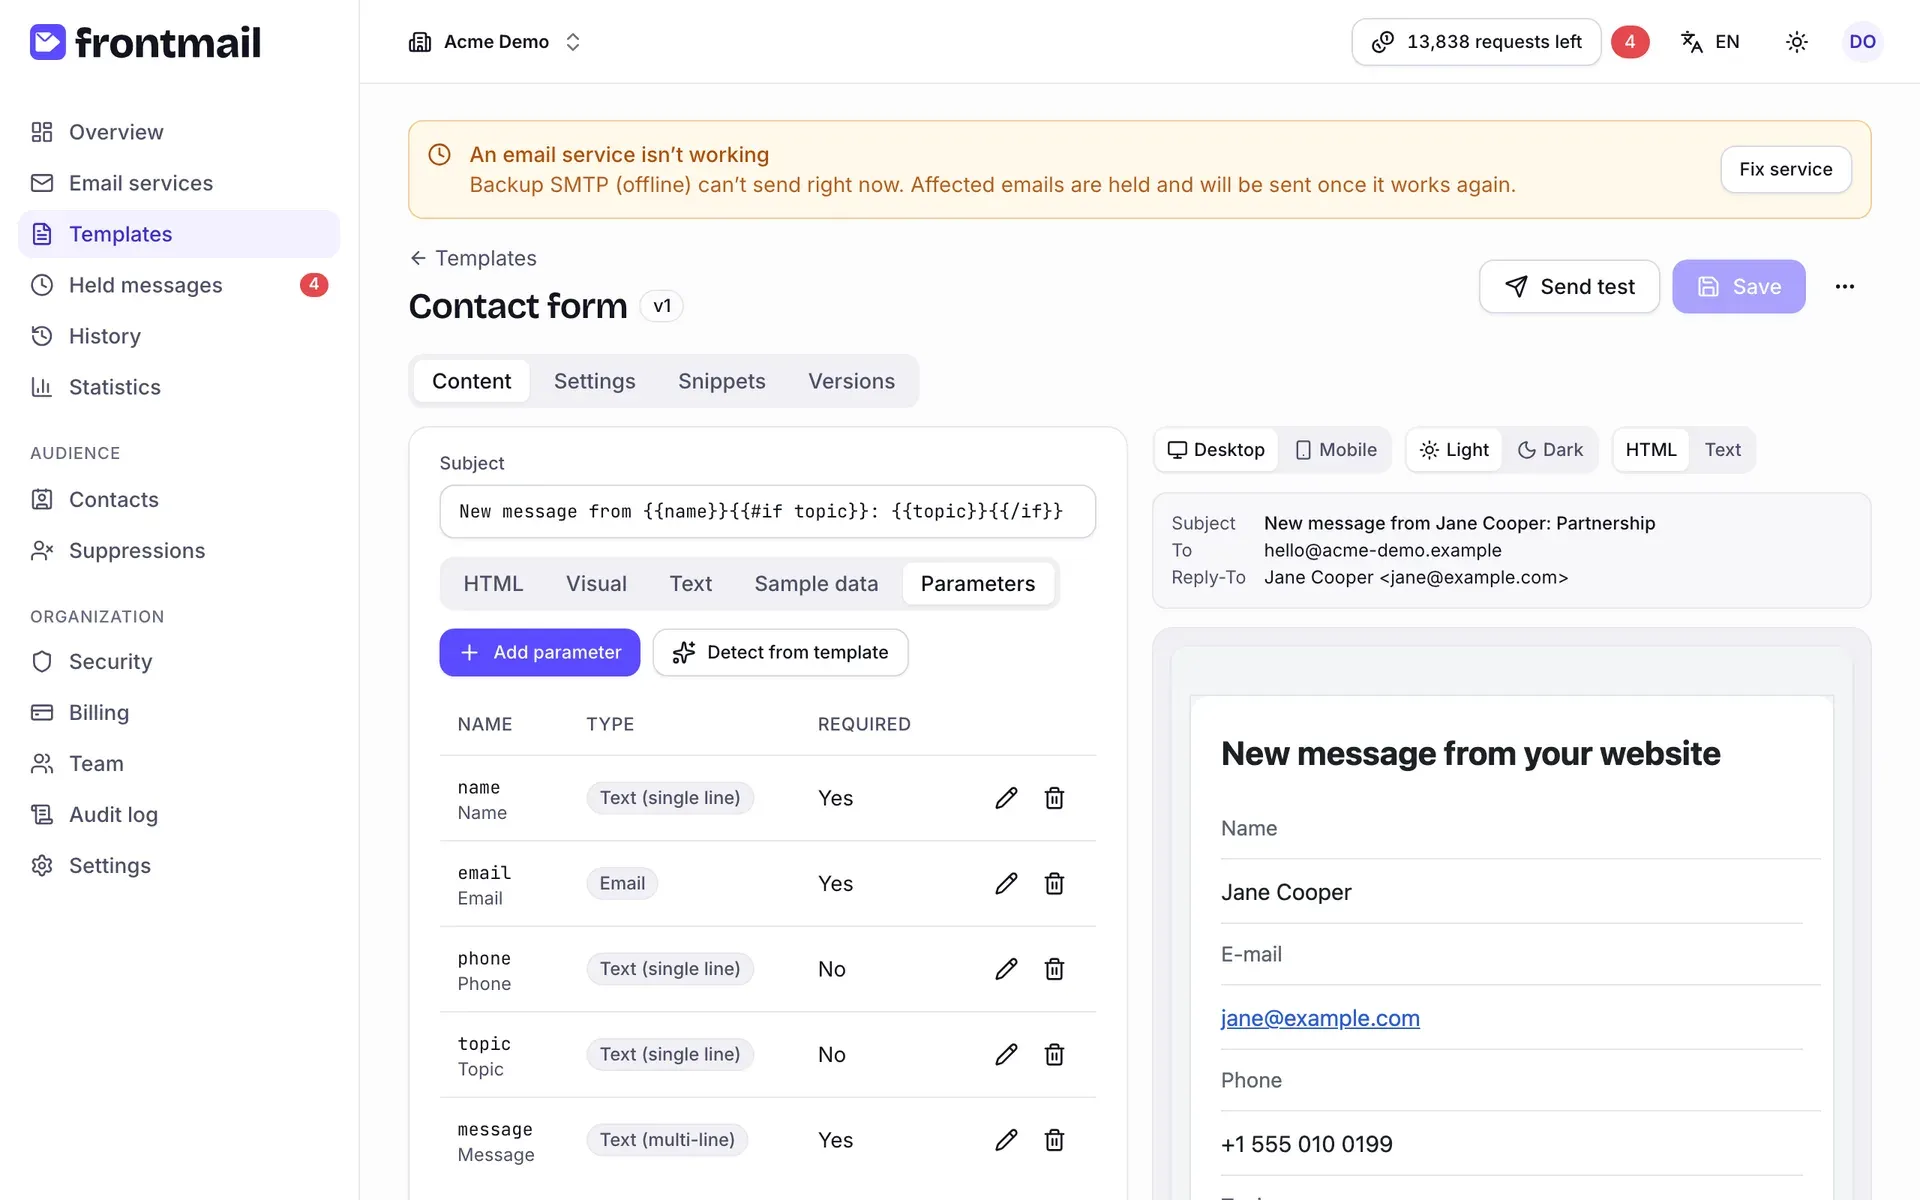
Section titled “Parameters”The parameter schema: every parameter’s Name, Type and whether it’s Required.
How to detect parameters from the template
- Use your parameters in the HTML, subject or recipients, e.g.
{{name}}. - Click Detect from template.
Frontmail adds every parameter it finds and tells you how many were new (2 new parameters found.).
Frontmail guesses each type from the name and how the parameter is used (for example a parameter
used in {{#each}} becomes a list) – check the types and rules afterwards.
How to add or edit a parameter
- Click Add parameter, or the pencil next to an existing one.
- Fill in:
- Name – letters, digits,
_and-, must be unique, - Type – Text (single line), Text (multi-line), Email, URL, Number, Yes / no, Date, Choice, HTML (sanitized) or List,
- Label and Description – shown in the sample-data form,
- Required,
- rules for the type: Min. length, Max. length and Pattern (regex) for text types,
Minimum/Maximum for numbers, Allowed values for a choice (comma-separated),
Item fields and Min. items/Max. items for lists
(e.g.
name:string!, qty:number–!means required), - Default value and Sample value (JSON for lists).
- Name – letters, digits,
- Click Save.
Remove a parameter with the trash icon. Types and rules are explained in Parameters and types.
Live preview
Section titled “Live preview”The preview renders the template exactly like the sender does, with your sample data, as you type. Above it you can switch:
- Desktop / Mobile – the preview width,
- Light / Dark – simulates a mail app in dark mode (your
prefers-color-schemestyles), - HTML / Text – the HTML version or the plain-text version.
Above the email you see the rendered Subject, To and Reply-To. If the template can’t
be rendered (for example an unclosed {{#if}}), you see The template can’t be rendered with
the error. On the Free plan the preview includes the Sent via Frontmail footer, just like real
emails. More in Preview and test sends.
Checks
Section titled “Checks”Under the preview, Checks lists problems as you type – for example parameters used but not
defined, defined but unused, invalid Handlebars, missing alt text or an email that’s too large.
Each item is an Error or a Warning, often with the line number. The Content tab shows
the number of issues in a badge. Everything looks good. means there’s nothing to fix.
Errors block saving content changes (Fix the errors in the checks before saving.); warnings don’t.
Settings
Section titled “Settings”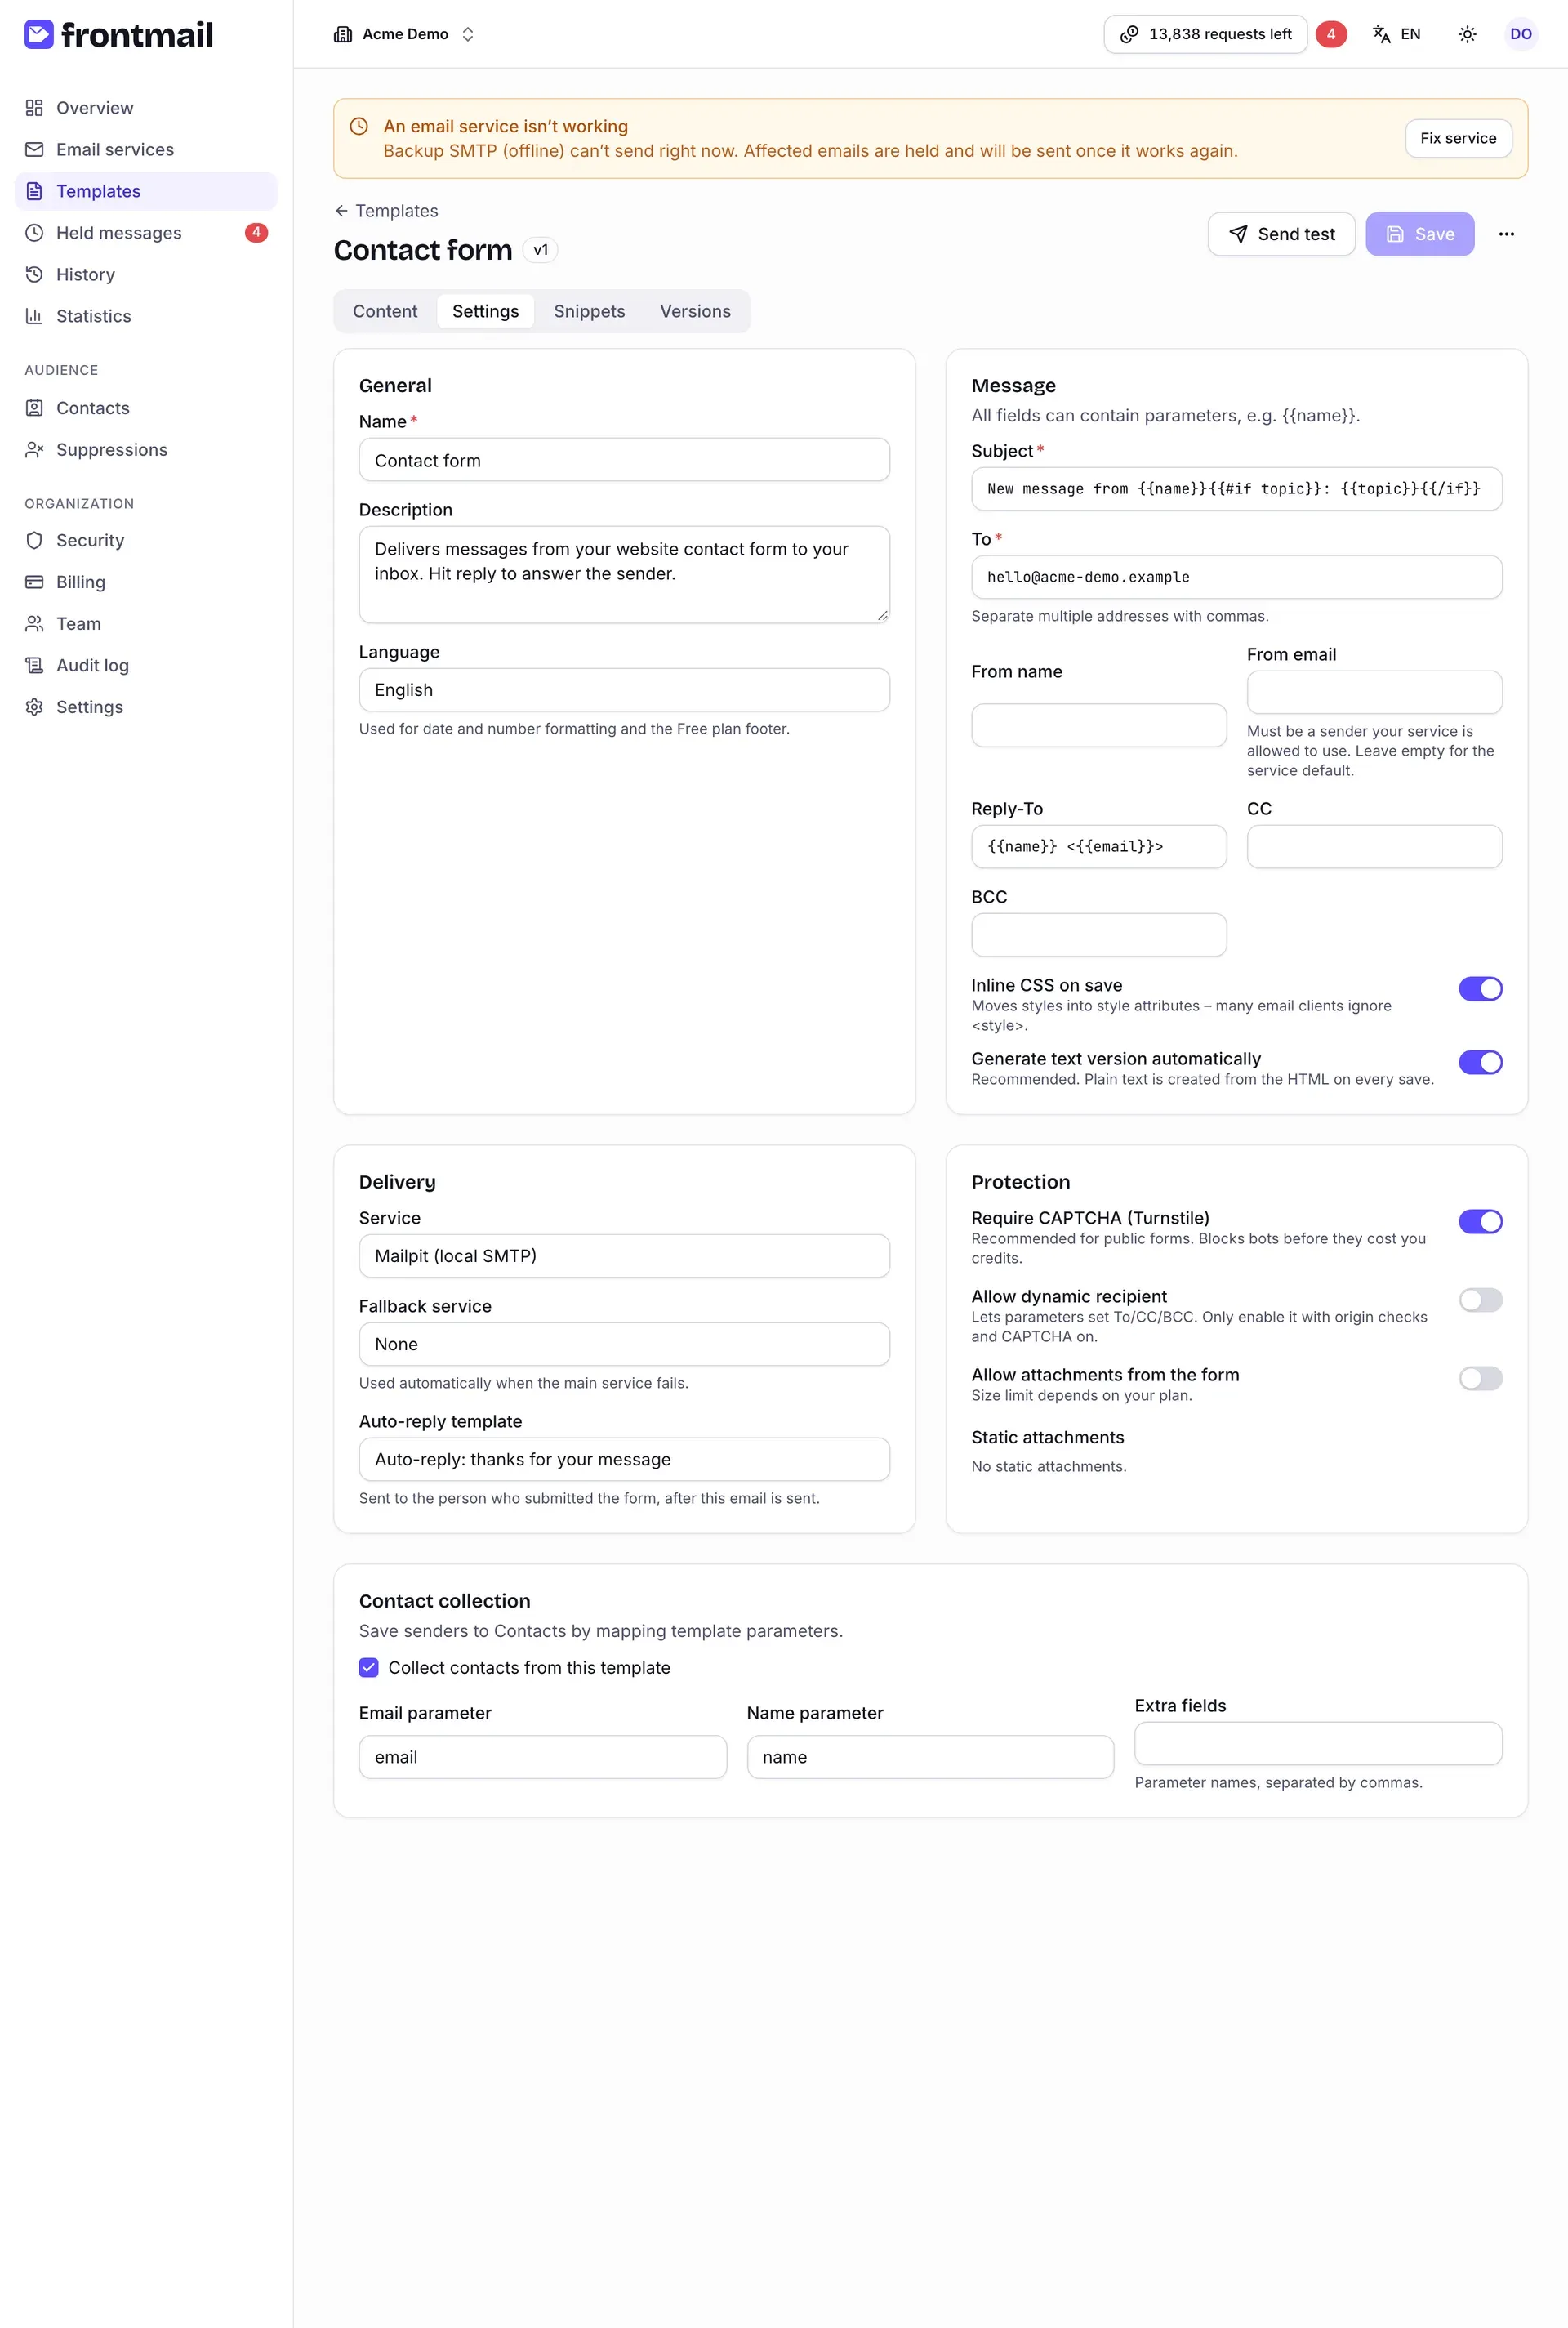
General
Section titled “General”- Name and Description – for you and your team.
- Language – used for date and number formatting and for the Free plan footer.
Message
Section titled “Message”All fields can contain parameters, e.g. {{name}}.
- Subject (the same field as on the Content tab).
- To – separate multiple addresses with commas.
- From name and From email – the sender must be one your service is allowed to use. Leave From email empty to use the service’s default sender.
- Reply-To, CC, BCC.
- Inline CSS on save – moves styles into
styleattributes, because many email clients ignore<style>. - Generate text version automatically – recommended; the text version is created from the HTML on every save.
Delivery
Section titled “Delivery”- Service – which email service sends this template. Default service follows whichever service is currently the default.
- Fallback service – used automatically when the main service fails. Choose None for no fallback. See Fallback service.
- Auto-reply template – another template sent to the person who submitted the form, after this email is sent. See Auto-reply.
Protection
Section titled “Protection”- Require CAPTCHA (Turnstile) – recommended for public forms; blocks bots before they cost you
credits. New templates have it on once your organization has added its own Turnstile keys in
Security → Bot protection (Turnstile).
Without keys the switch can’t be turned on and a note links to the Security page. If Allow
mobile apps is on, you can still turn it on – the editor warns that mobile apps will work (they
use Frontmail’s shared key) but requests from websites fail with
captcha_not_configureduntil you add keys. See Turnstile. - Allow dynamic recipient – lets parameters set To/CC/BCC. With the public key the content of such a template is locked: CAPTCHA is required, From / From name / Reply-To must be fixed, HTML params aren’t accepted, texts are limited to 500 characters and links may only point to allowed domains. Without CAPTCHA the editor shows a warning with a link to set up Turnstile – or send the template from your server with a private key.
- Only allow links to allowed domains – applies the link allowlist to every request, including private-key sends. On by default for gallery templates with a dynamic recipient.
- Allow attachments from the form – accept files sent with the request. The size limit depends on your plan.
- Static attachments – files attached to every email of this template. See Attachments.
Contact collection
Section titled “Contact collection”Tick Collect contacts from this template to save everyone who submits the form to Contacts. Then choose the Email parameter, optionally the Name parameter, and list Extra fields (parameter names, comma-separated) to store with the contact. See Contacts.
Snippets
Section titled “Snippets”Ready-to-paste code for HTML / JS, React, Vue, Svelte, React Native, Node.js and cURL, already filled with your public key, the template’s service and ID and all its parameters.
When the template requires the CAPTCHA, the web snippets include the Turnstile widget with your
organization’s site key (YOUR_TURNSTILE_SITE_KEY as a placeholder if you haven’t added keys yet),
and the React Native snippet uses <TurnstileWebView> with Frontmail’s shared mobile key – no
site key needed.
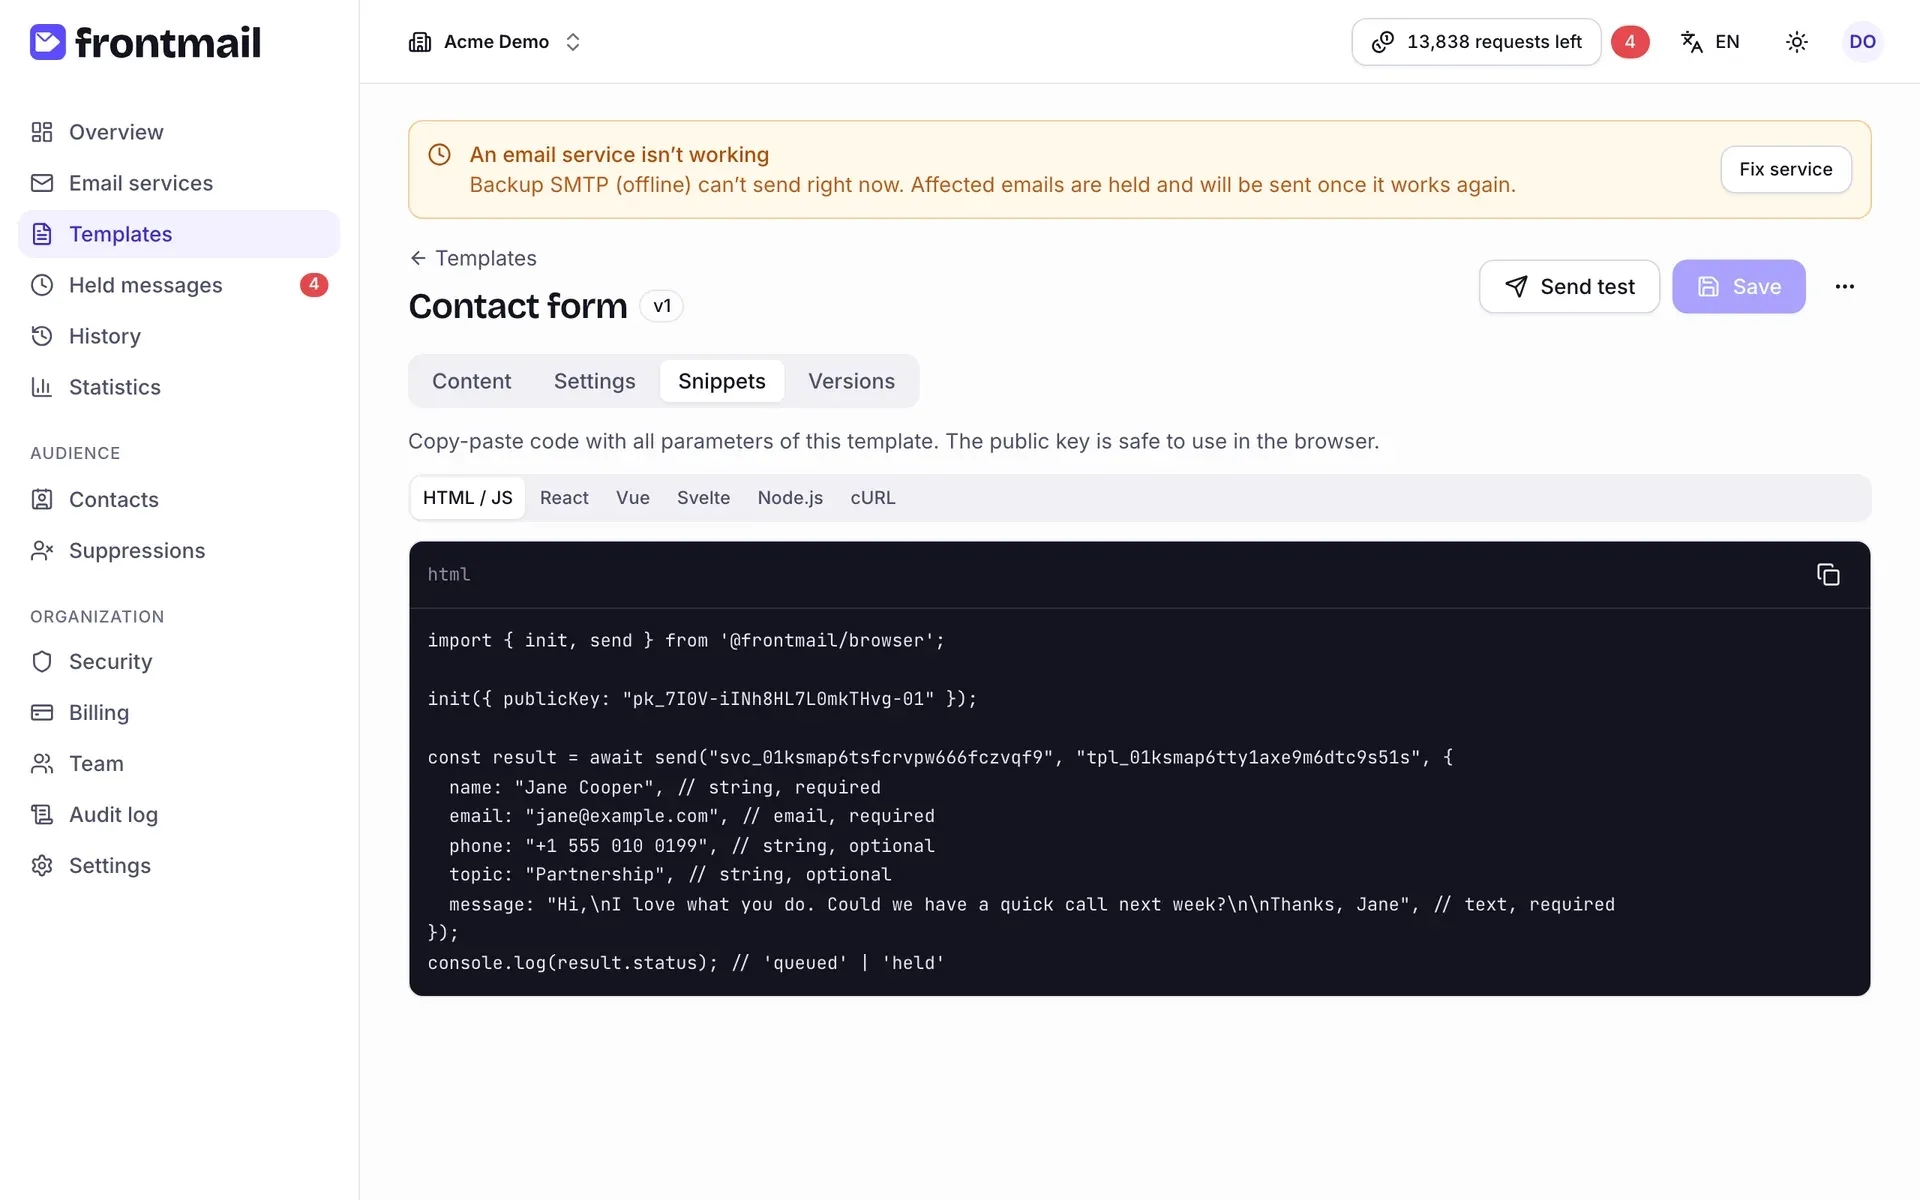
The public key is safe to use in the browser. The Node.js and cURL snippets are for servers, where you use a private key instead – see Public and private keys.
How to send a test email
Section titled “How to send a test email”- Click Send test.
- Enter the address in Send to (your own address is prefilled).
- Optionally choose another Service; Template’s service uses the one from Settings.
- Click Send test.
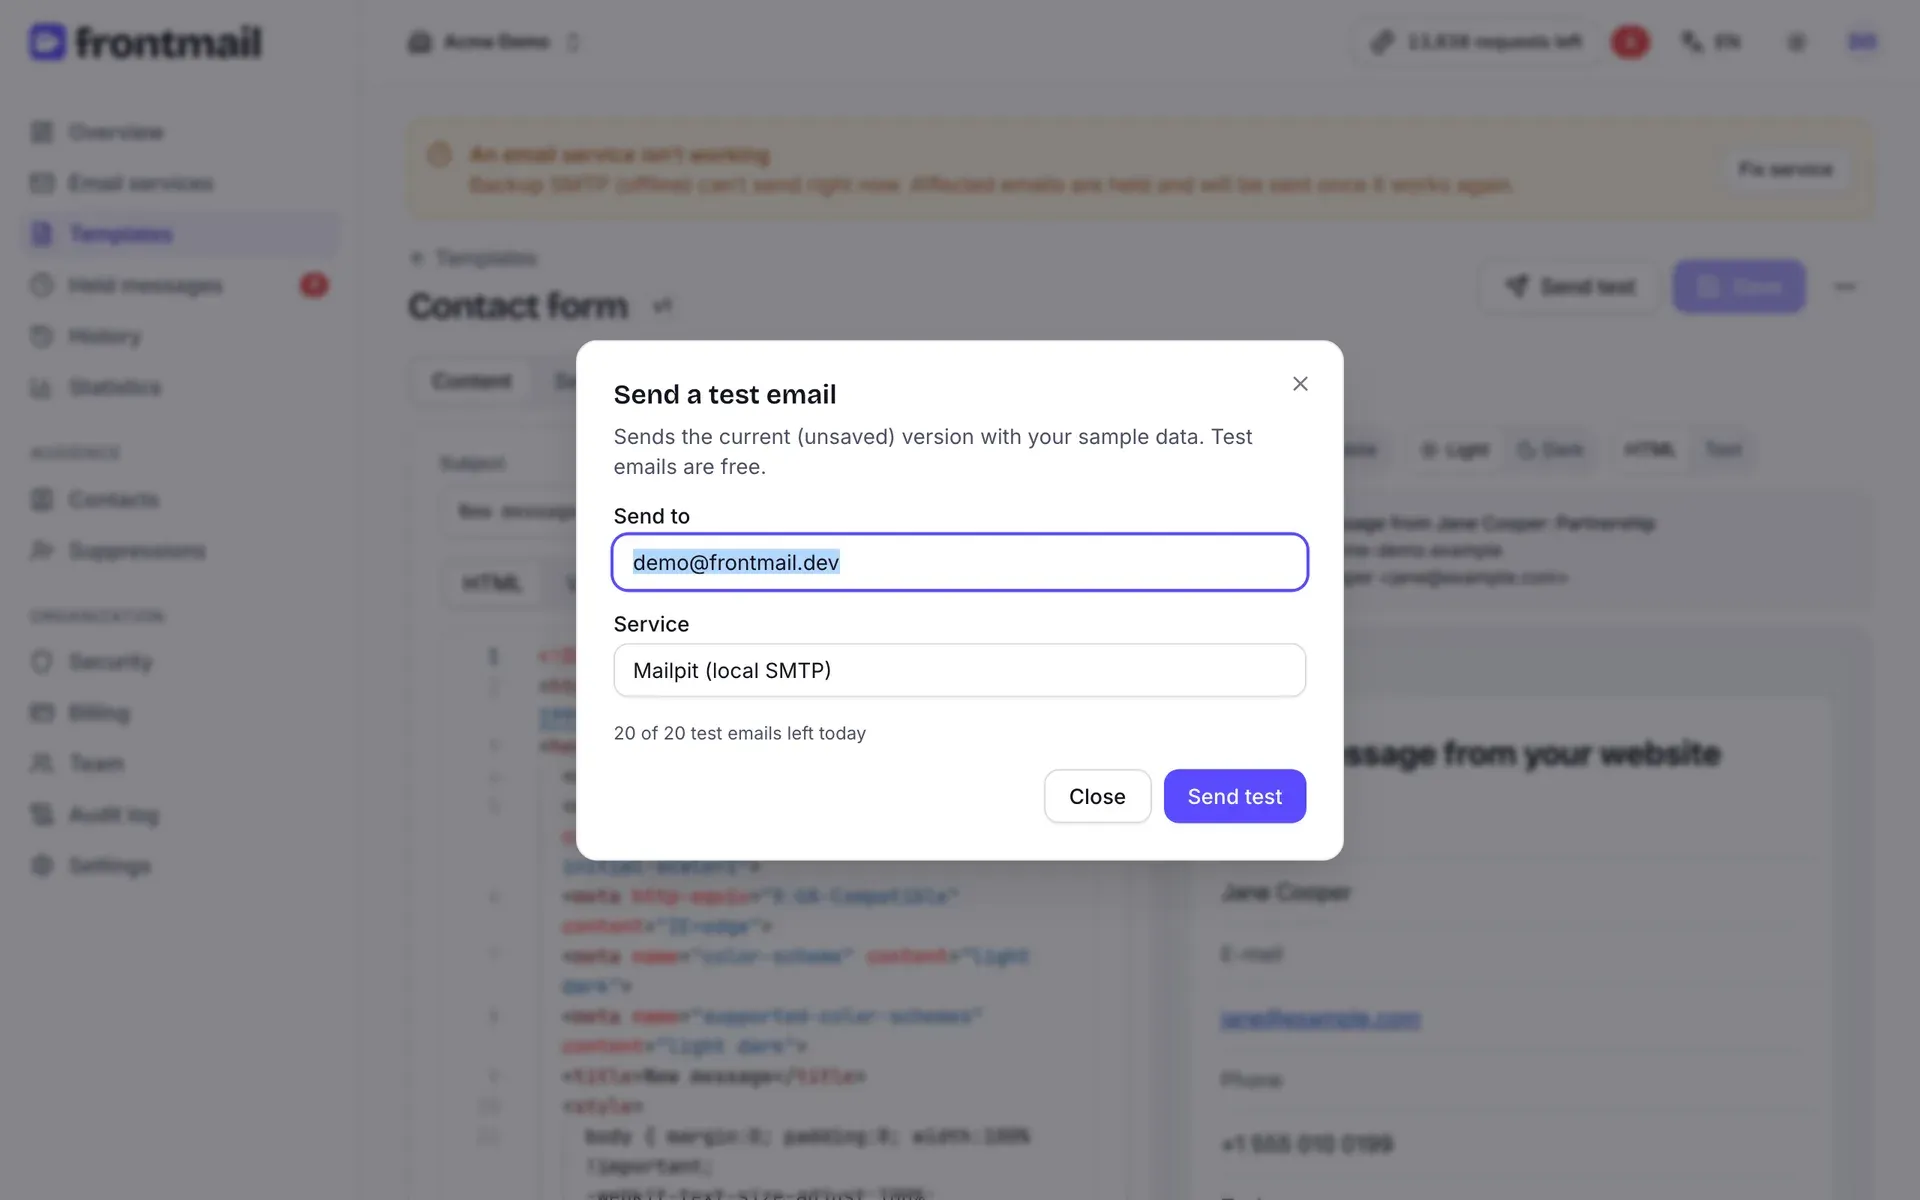
The test uses the current, unsaved content with your sample data, so you can try changes
before saving. The subject starts with [Test]. Test emails are free: up to
20 per organization per day (counted in UTC), shown
as N of 20 test emails left today. They appear in History marked test.
Versions
Section titled “Versions”Every save of the template’s content creates a new version. The Versions tab lists them with the Version, Author, Saved time and Note; the current one is marked current.
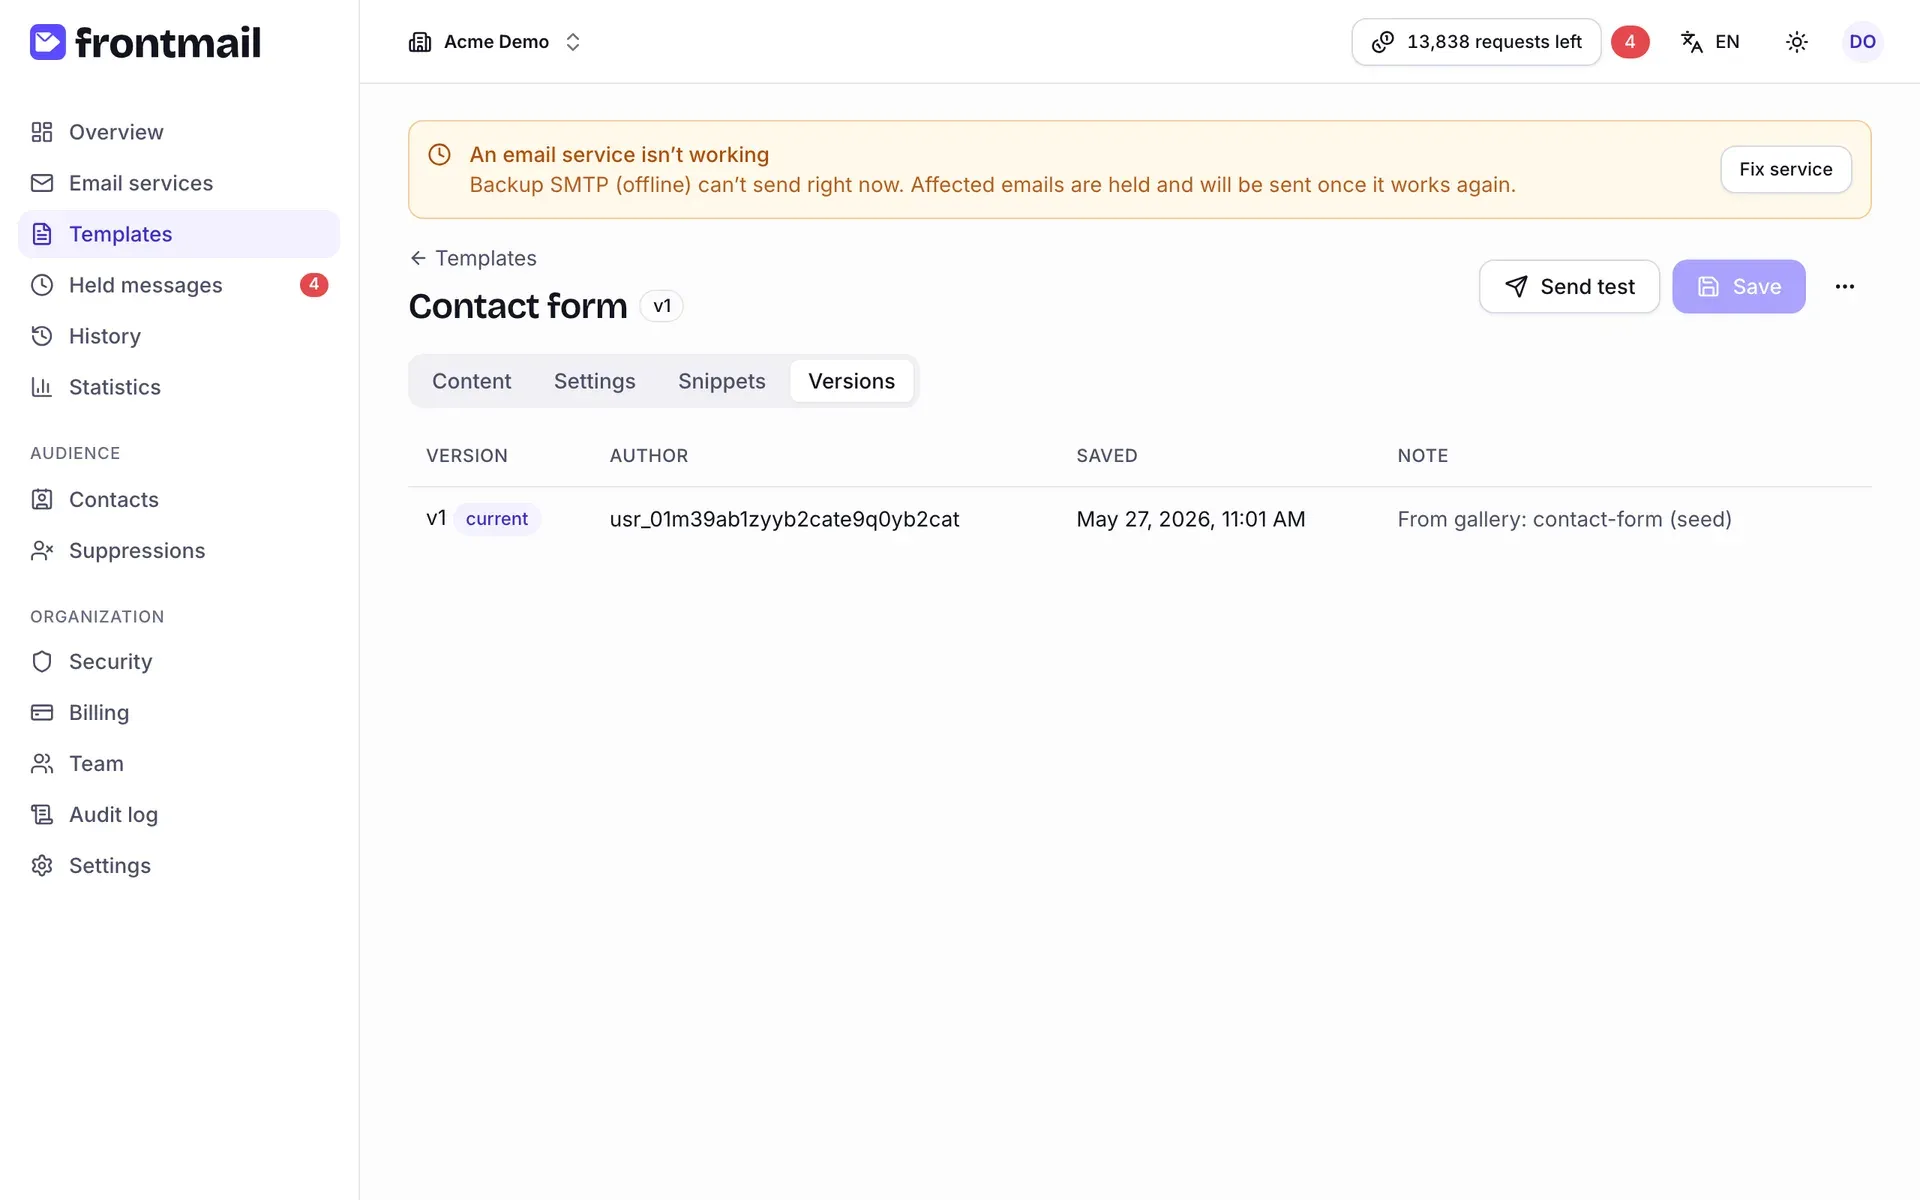
- Changes – what changed compared to the previous version.
- Compare with current – differences between that version and the current one.
The comparison opens below the list. Switch between HTML, Text, Subject, Parameters and Recipients to see each part.
How to restore an older version
- Click Restore next to the version.
- Confirm. If you have unsaved changes, they’re replaced.
Restoring creates a new version with the old content – nothing is lost. Template settings (service, protection, contact collection) aren’t versioned. See Versions, diff and rollback.
Saving and versions
Section titled “Saving and versions”- Click Save or press Ctrl + S (⌘ + S on Mac). You see Saved as version N.
- Changes to the content (subject, HTML, text, recipients, parameters) create a new version; changes to name and settings are saved without one.
- If you try to leave the editor with unsaved changes, the browser asks you to confirm.
When someone else saved in the meantime
Section titled “When someone else saved in the meantime”If a colleague saved the template while you were editing, Frontmail doesn’t overwrite their work silently. The Someone else saved this template dialog offers:
- Compare HTML – show their HTML next to yours,
- Reload their version – load their version; your changes are lost,
- Keep mine – save your version on top of theirs.
Replace HTML, export and delete
Section titled “Replace HTML, export and delete”All three are in the More actions (⋯) menu.
- Replace HTML – upload an
.htmlfile or paste HTML to replace the body of this template. Parameters aren’t changed – review them (or use Detect from template) and save. - Export (.json) – downloads the template as a
.frontmail.jsonfile you can import into another organization. - Delete – removes the template and all its versions. Emails already sent stay in History.