

Security settings
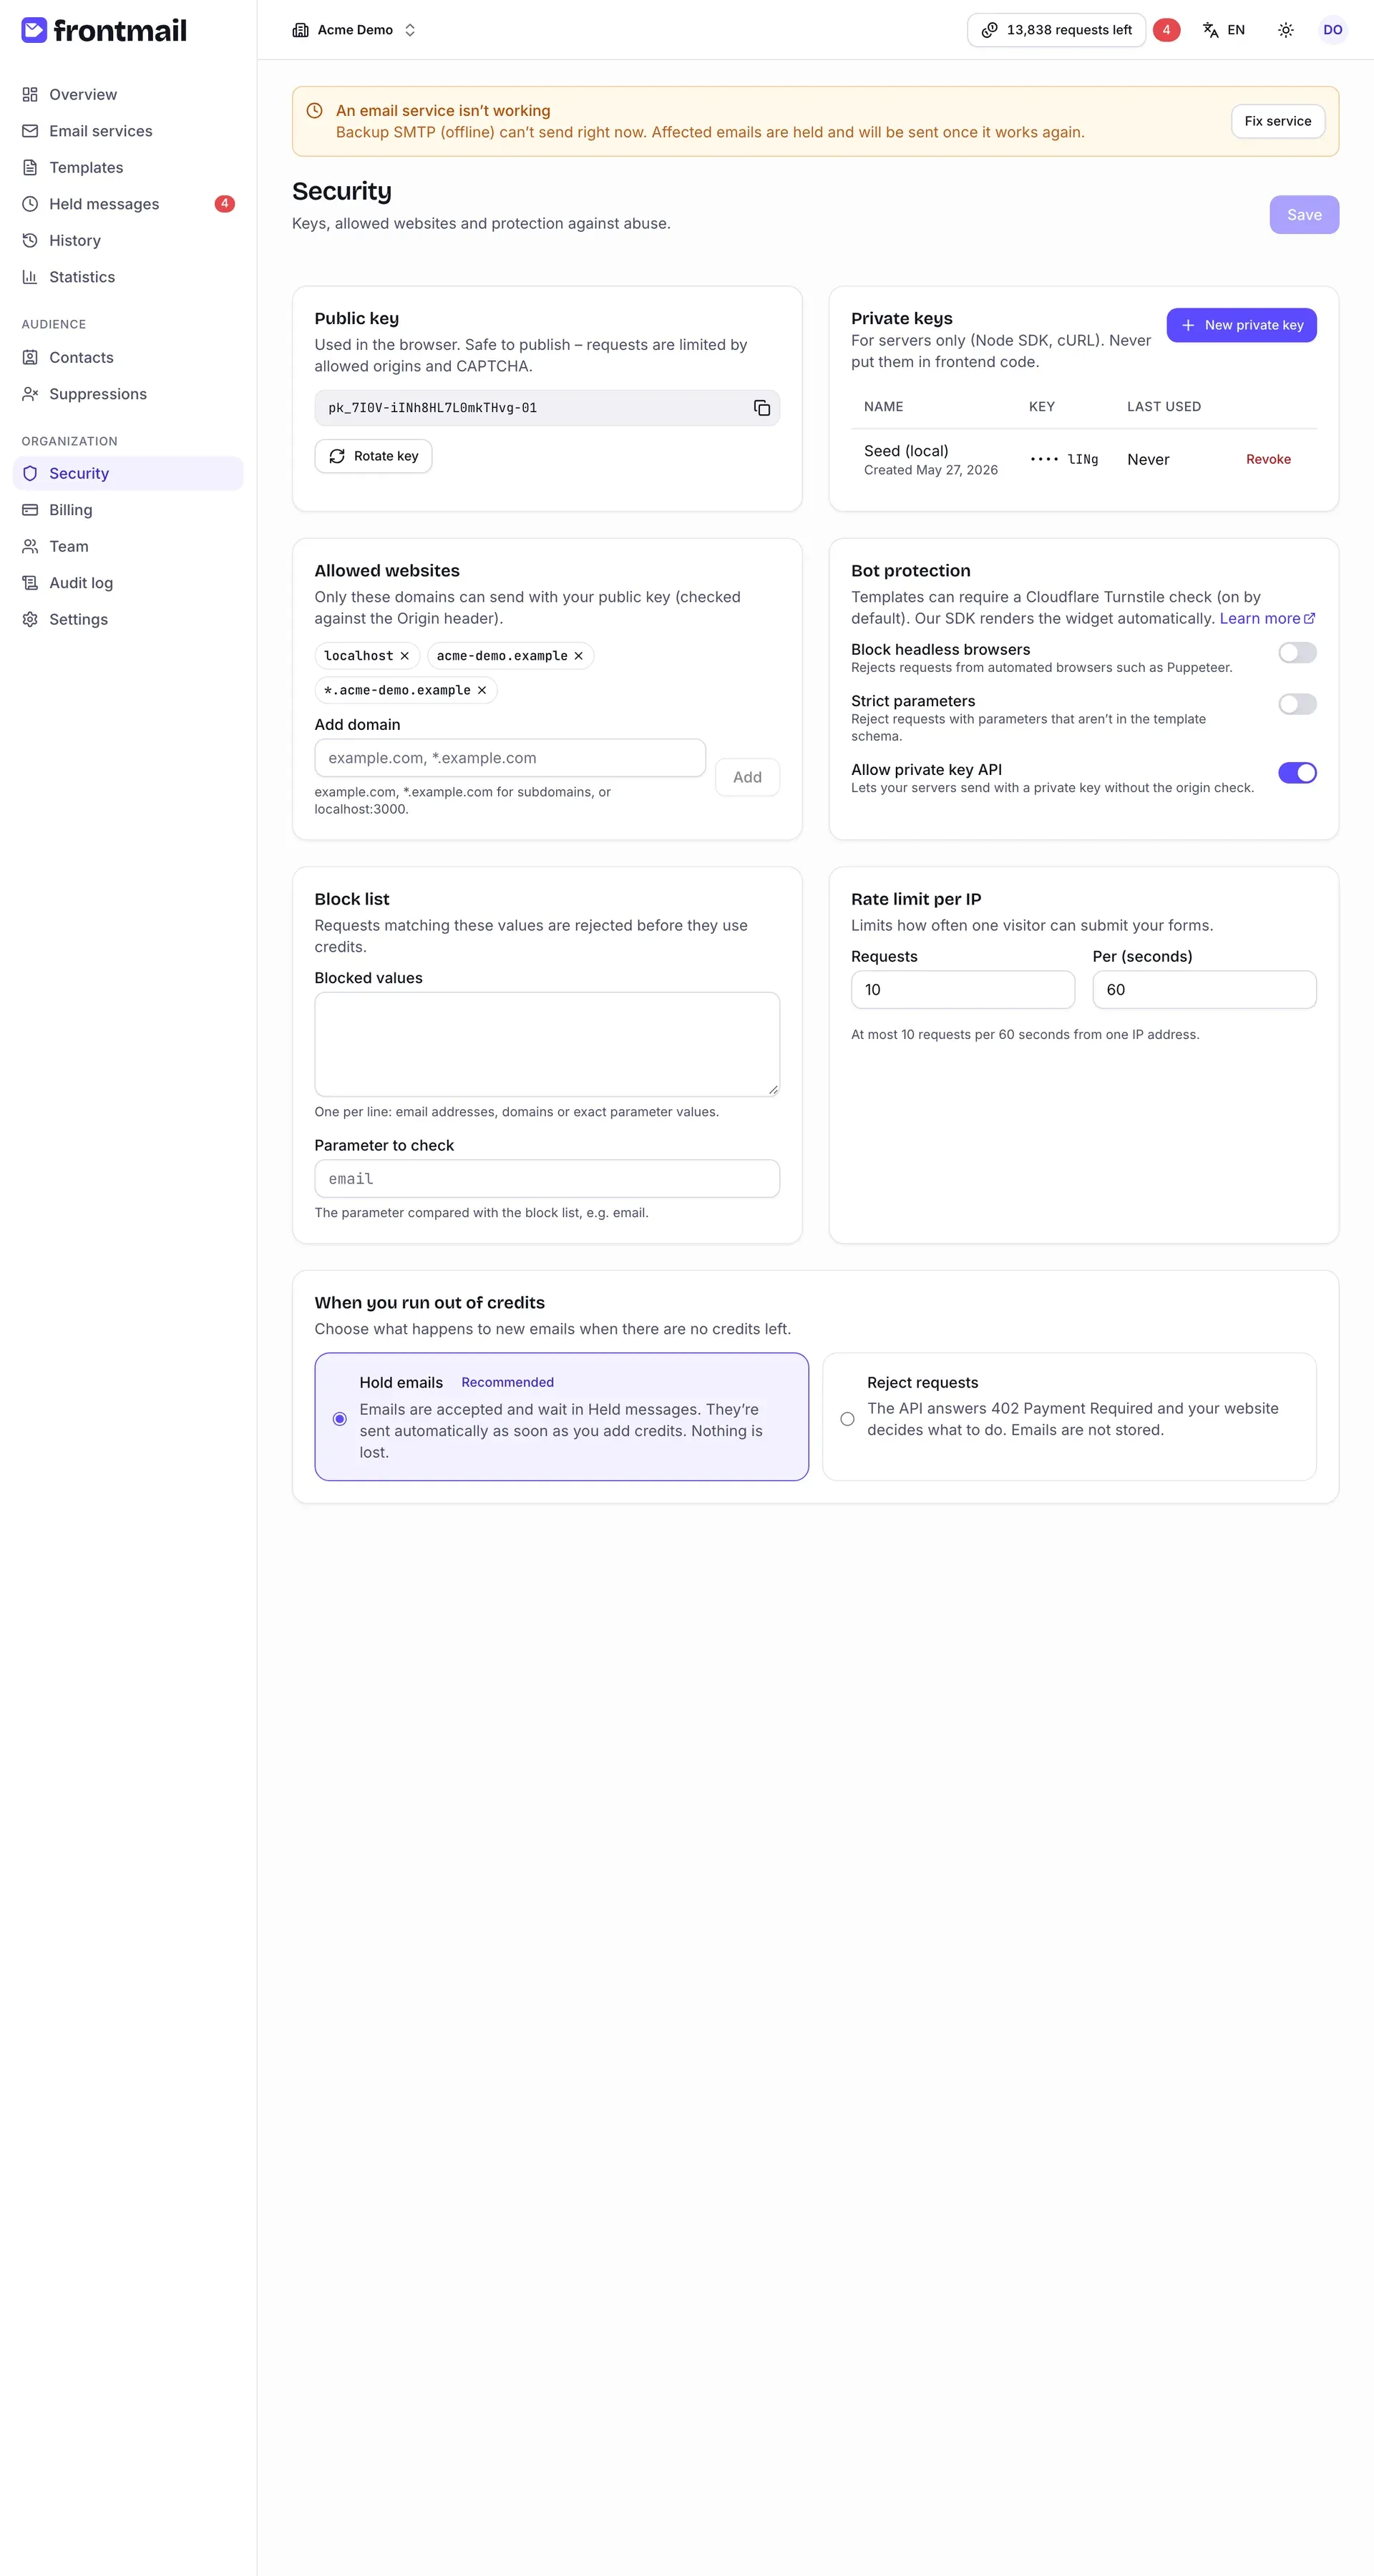
The Security page holds your organization’s API keys and everything that protects your public key from abuse.
Who can use this page
Section titled “Who can use this page”| Role | Access |
|---|---|
| Owner, Admin | See and change everything. |
| Developer | Read-only: sees the keys and settings, but no buttons and all fields are disabled. |
| Viewer, Billing | No access – the page shows a notice that your role doesn’t allow this. |
Saving changes
Section titled “Saving changes”Key actions – Rotate key, New private key and Revoke – take effect immediately after you confirm them.
The Turnstile keys in Bot protection (Turnstile) are saved with the card’s own Save keys button.
All other settings on the page (allowed websites, abuse protection switches, mobile apps, block list, rate limit, allowed link domains, emails per recipient
and the out-of-credits choice) are only a draft until you click Save in the top right corner.
The button is active only when something has changed. Every save is recorded in the
audit log as security.updated.
Public key
Section titled “Public key”The Public key card shows your pk_… key with a copy button. It’s the key you put into your
website – it’s safe to publish, because requests with it are checked against allowed websites,
CAPTCHA and rate limits. See Public and private keys.
How to rotate the public key
Section titled “How to rotate the public key”Rotate it when you see abuse despite your other protections.
- Click Rotate key.
- Confirm with Rotate key in the Rotate the public key? dialog.
- Copy the new key and deploy it to your website.
The old key keeps working for 24 hours. Until then, the card shows a note saying which
previous key still works and until when. After that, requests with the old key fail with
invalid_public_key.
Private keys
Section titled “Private keys”Private keys are for servers only – the Node SDK, cURL, your backend. The table shows each key’s Name with its creation date, the last four characters under Key and when it was Last used (Never if it hasn’t been used yet).
An organization can have at most 20 active private keys.
How to create a private key
Section titled “How to create a private key”- Click New private key.
- Enter a Name that says where you’ll use it, e.g. “Production backend”, and click Create.
- The Your new private key dialog shows the full key. Copy it now and store it in your server secrets or password manager.
- Click I’ve stored it safely.
How to revoke a private key
Section titled “How to revoke a private key”- Click Revoke in the key’s row.
- Confirm with Revoke in the dialog.
Revocation is immediate – requests with the key are rejected right away with
invalid_private_key. To replace a key without
downtime, create the new key first, deploy it, check that Last used of the old key stops
changing and only then revoke it.
Allowed websites
Section titled “Allowed websites”Only the domains listed under Allowed websites can send with your public key. Frontmail checks
them against the browser’s Origin header. Details are in Allowed origins.
Accepted formats:
| Entry | Matches |
|---|---|
example.com |
Exactly this domain. |
*.example.com |
Any subdomain of example.com. |
localhost:3000 |
A host with a specific port – handy for local development. |
If you paste a full URL such as https://example.com/contact, the dashboard keeps only the host.
How to allow a website
Section titled “How to allow a website”- Type the domain into Add domain.
- Click Add (or press Enter). The domain appears as a tag above the field.
- Click Save.
To remove a domain, click the × in its tag and then Save.
Bot protection (Turnstile)
Section titled “Bot protection (Turnstile)”This card holds your organization’s own Cloudflare Turnstile keys. Templates
with Require CAPTCHA (Turnstile) on accept requests from your websites only with a Turnstile
token, and Frontmail verifies those tokens with the secret key you store here. Without keys, website
requests for such templates fail with
captcha_not_configured.
Why your own keys: Cloudflare’s free plan allows only 10 hostnames per widget, so one Frontmail key can’t cover every customer’s website. Your widget is free and only works on your hostnames.
How to add your Turnstile keys
Section titled “How to add your Turnstile keys”- In the Cloudflare dashboard open Turnstile → Add widget,
name it, add your website hostnames (e.g.
example.com,www.example.com;localhostonly for testing), keep Managed mode and click Create. - Copy the Site Key and the Secret Key.
- Back on the Security page, paste both keys into the Bot protection (Turnstile) card and click Save keys.
- Click Turn on CAPTCHA for all templates to switch it on for your existing templates in one click. Templates used as an auto-reply are skipped.
Saving checks the secret with Cloudflare first – a wrong secret is rejected with a clear message
and nothing is stored. The keys are saved immediately (the page’s Save button isn’t needed) and
recorded in the audit log as security.turnstile.updated; turning the
CAPTCHA on for all templates is recorded as template.captcha_enabled.
- The secret key is write-only: it’s stored encrypted and never shown again – the card only
shows the site key and since when the keys are configured. To change them, click Replace keys
and paste new ones; to stop using them, click Remove keys and confirm Remove the Turnstile
keys? (
security.turnstile.removed). Templates keep their CAPTCHA setting, so after removing the keys, website requests to them fail until you add keys again. - Once keys are saved, new templates have the CAPTCHA on by default. Templates created before keep their setting.
- The template editor’s Snippets tab then includes the widget with your site key.
- For local development you can use Cloudflare’s test keys – never in production.
Mobile apps built with @frontmail/react-native don’t need these
keys – they use Frontmail’s shared mobile key.
Abuse protection
Section titled “Abuse protection”Whether a template requires the Turnstile CAPTCHA is set per template in the template editor, not here – see Turnstile. The Abuse protection card has four switches:
| Switch | What it does |
|---|---|
| Block headless browsers | Rejects public-key requests from automated browsers such as Puppeteer. Off by default. See Bot protection. |
| Strict parameters | Rejects requests with parameters that aren’t in the template’s schema, instead of ignoring them. Off by default. |
| Allow private key API | Lets your servers send with a private key, which skips the website check. On by default. Turn it off if you only send from browsers – requests with a private key are then refused with 403 forbidden. |
| Allow private keys in browsers | Accepts private-key requests that come from a web page (with an Origin header). Off by default – such requests are refused with 403 private_key_in_browser, because every visitor of the page could copy the key. Turn it on only for internal tools; a warning appears when you do. See Keys. |
Remember to click Save after changing a switch.
Mobile apps
Section titled “Mobile apps”Native apps (React Native, Flutter, Swift, Kotlin) don’t send an Origin header, so their
requests – like any public-key request without Origin and Referer – are rejected with
403 origin_not_allowed, even when no allowed websites
are set. The Mobile apps card has one switch, Allow mobile apps (off by default). When it’s
on, public-key requests without an Origin or Referer header are accepted and their CAPTCHA is
verified with Frontmail’s shared mobile key. Requests from websites are still checked against the
list. Details are in
Allowed origins → Mobile apps.
How to allow mobile apps
Section titled “How to allow mobile apps”- Turn on Allow mobile apps.
- Read the warning that appears below the switch.
- Click Save.
Block list
Section titled “Block list”The Block list stops known spammers before their requests use any credits.
- Blocked values – one value per line: email addresses, domains (
spam.exampleor@spam.example) or exact parameter values. - Parameter to check – the parameter compared with the list in addition to the recipients,
e.g.
emailfor the visitor’s address in a contact form.
Matching requests fail with recipient_blocked. More in
Bot protection → Block list.
Rate limit per IP
Section titled “Rate limit per IP”Rate limit per IP limits how often a single visitor can submit your forms with the public key.
Set Requests (1–1,000) and Per (seconds) (1–86,400); the sentence below the fields
summarizes the result. The default is 10 requests per 60 seconds. Requests over the limit get
429 rate_limited and don’t use credits. Private-key requests aren’t limited per IP – see
Rate limits.
Allowed link domains
Section titled “Allowed link domains”When a template takes its recipient from params and is sent with the public key – and for every
auto-reply – links in the email may only point to domains you trust.
Links written directly in the template and your allowed websites are always allowed; add other
domains in Allowed link domains, one per line: example.com (exactly that host) or
*.example.com (subdomains only). Invalid lines are marked and block Save. Requests with a link
elsewhere fail with link_not_allowed. See
Link allowlist & content lock.
Emails per recipient per day (1–1,000, default 5) caps how many emails with a dynamic
recipient (public key) and auto-replies one address gets per day (UTC). Over the limit, requests
fail with 429 rate_limited (details.scope: "recipient") and no auto-reply is created.
When you run out of credits
Section titled “When you run out of credits”This card decides what happens to new emails when the organization has no credits left:
| Option | Behaviour |
|---|---|
| Hold emails (Recommended, default) | Emails are accepted and wait in Held messages. They’re sent automatically once you add credits. |
| Reject requests | The API answers 402 insufficient_credits and nothing is stored – your website decides what to tell the visitor. |
Pick an option and click Save. For the full picture, including how held emails are released, see Hold queue.