

Email services
An email service is the connection to the provider that actually delivers your emails – your Gmail or Outlook mailbox, an SMTP server or an API such as Postmark, Resend or Amazon SES. For how services, fallbacks and provider errors work in general, read the Services overview; this page shows how to manage them in the dashboard.
Adding, editing, testing and deleting services needs the Owner, Admin or Developer role. Other roles can open the pages read-only.
The service list
Section titled “The service list”Open Email services in the sidebar.
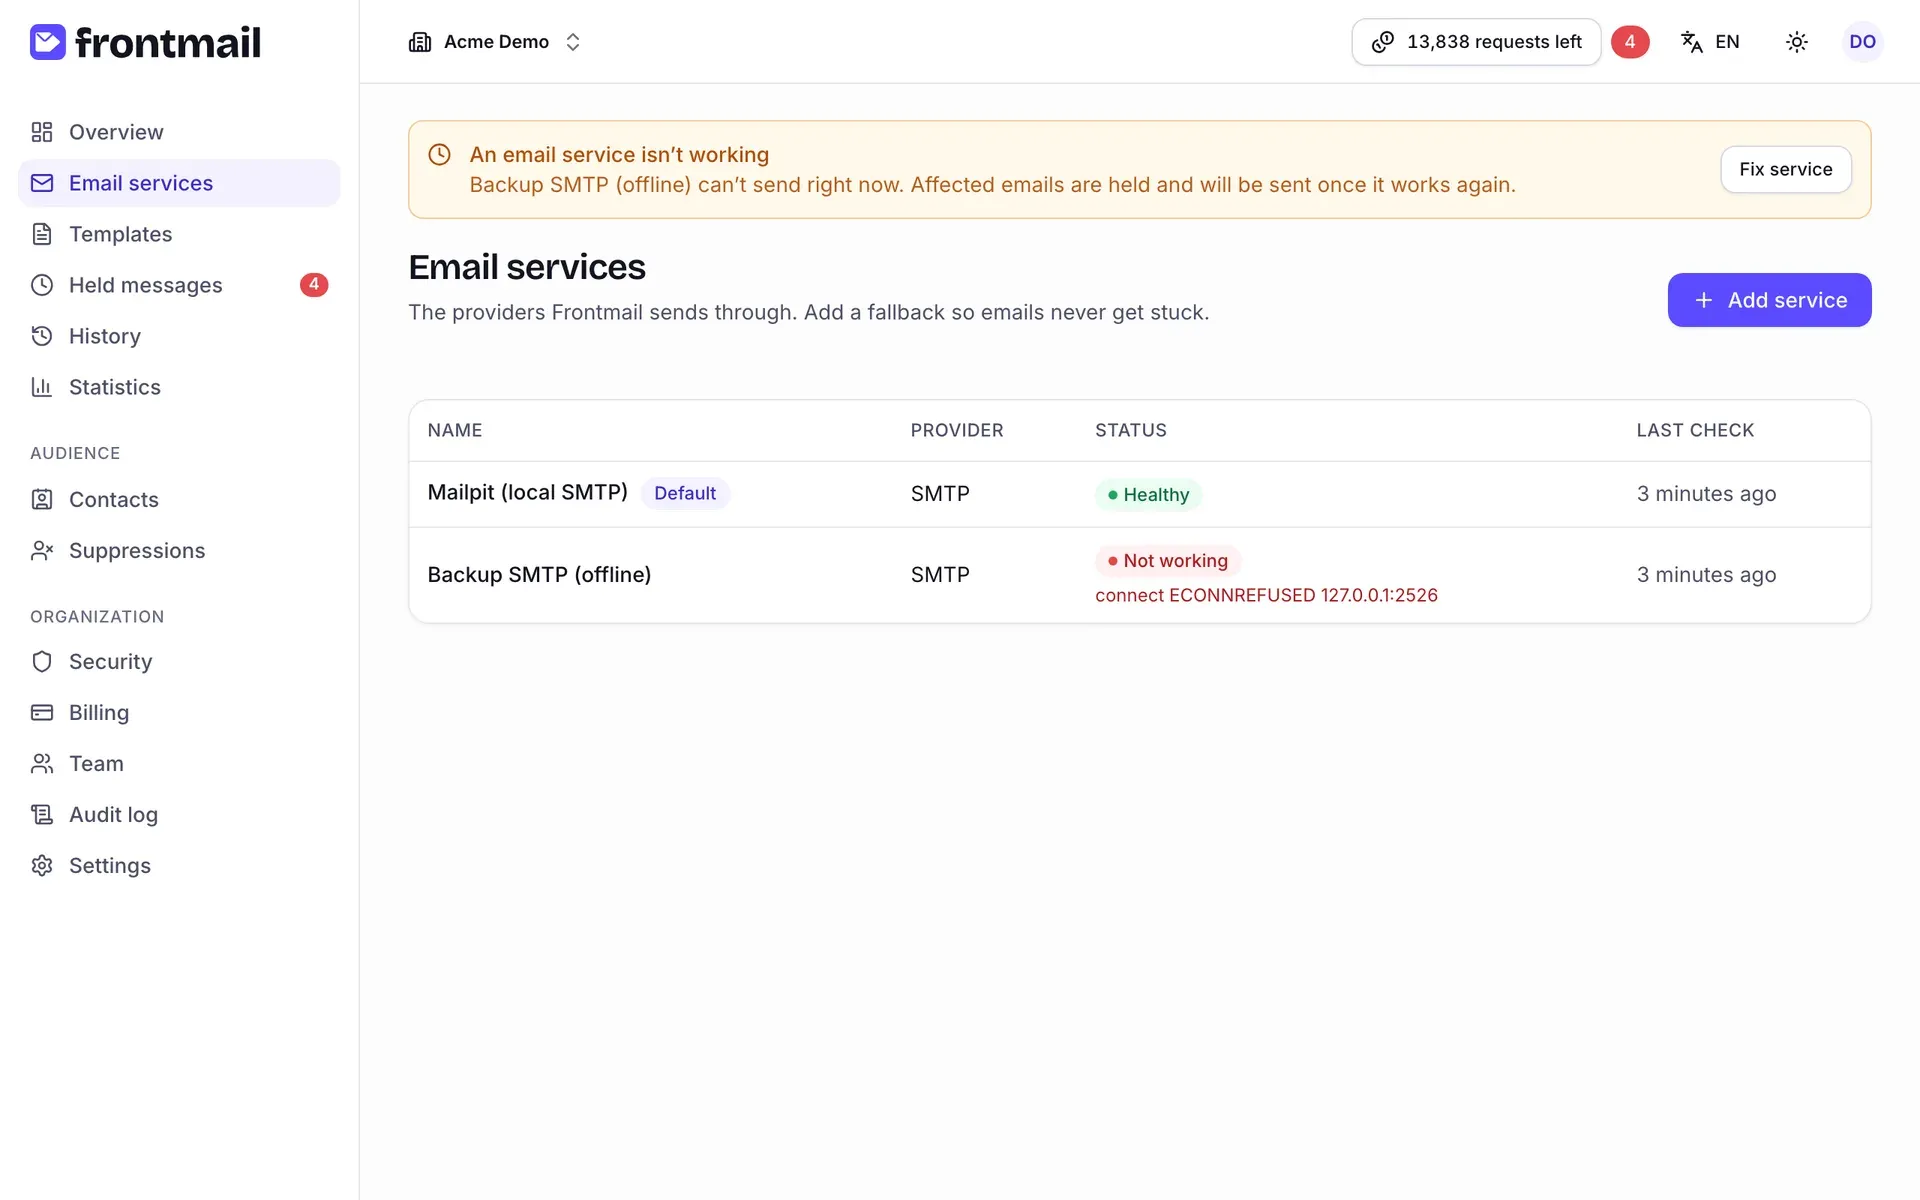
For each service you see:
- Name – with the Default badge on the default service,
- Provider – SMTP, Gmail, Postmark, …,
- Status – Healthy, Not working or Not checked; a broken service also shows the last error message,
- Last check – how long ago the connection was last verified.
Click a name to open the service.
How to add a service
Section titled “How to add a service”- Click Add service.
- Under Provider, pick your provider. Gmail and Outlook / Microsoft 365 say Connect with your account; all others say API key / credentials.
- Follow the steps for the provider type below.
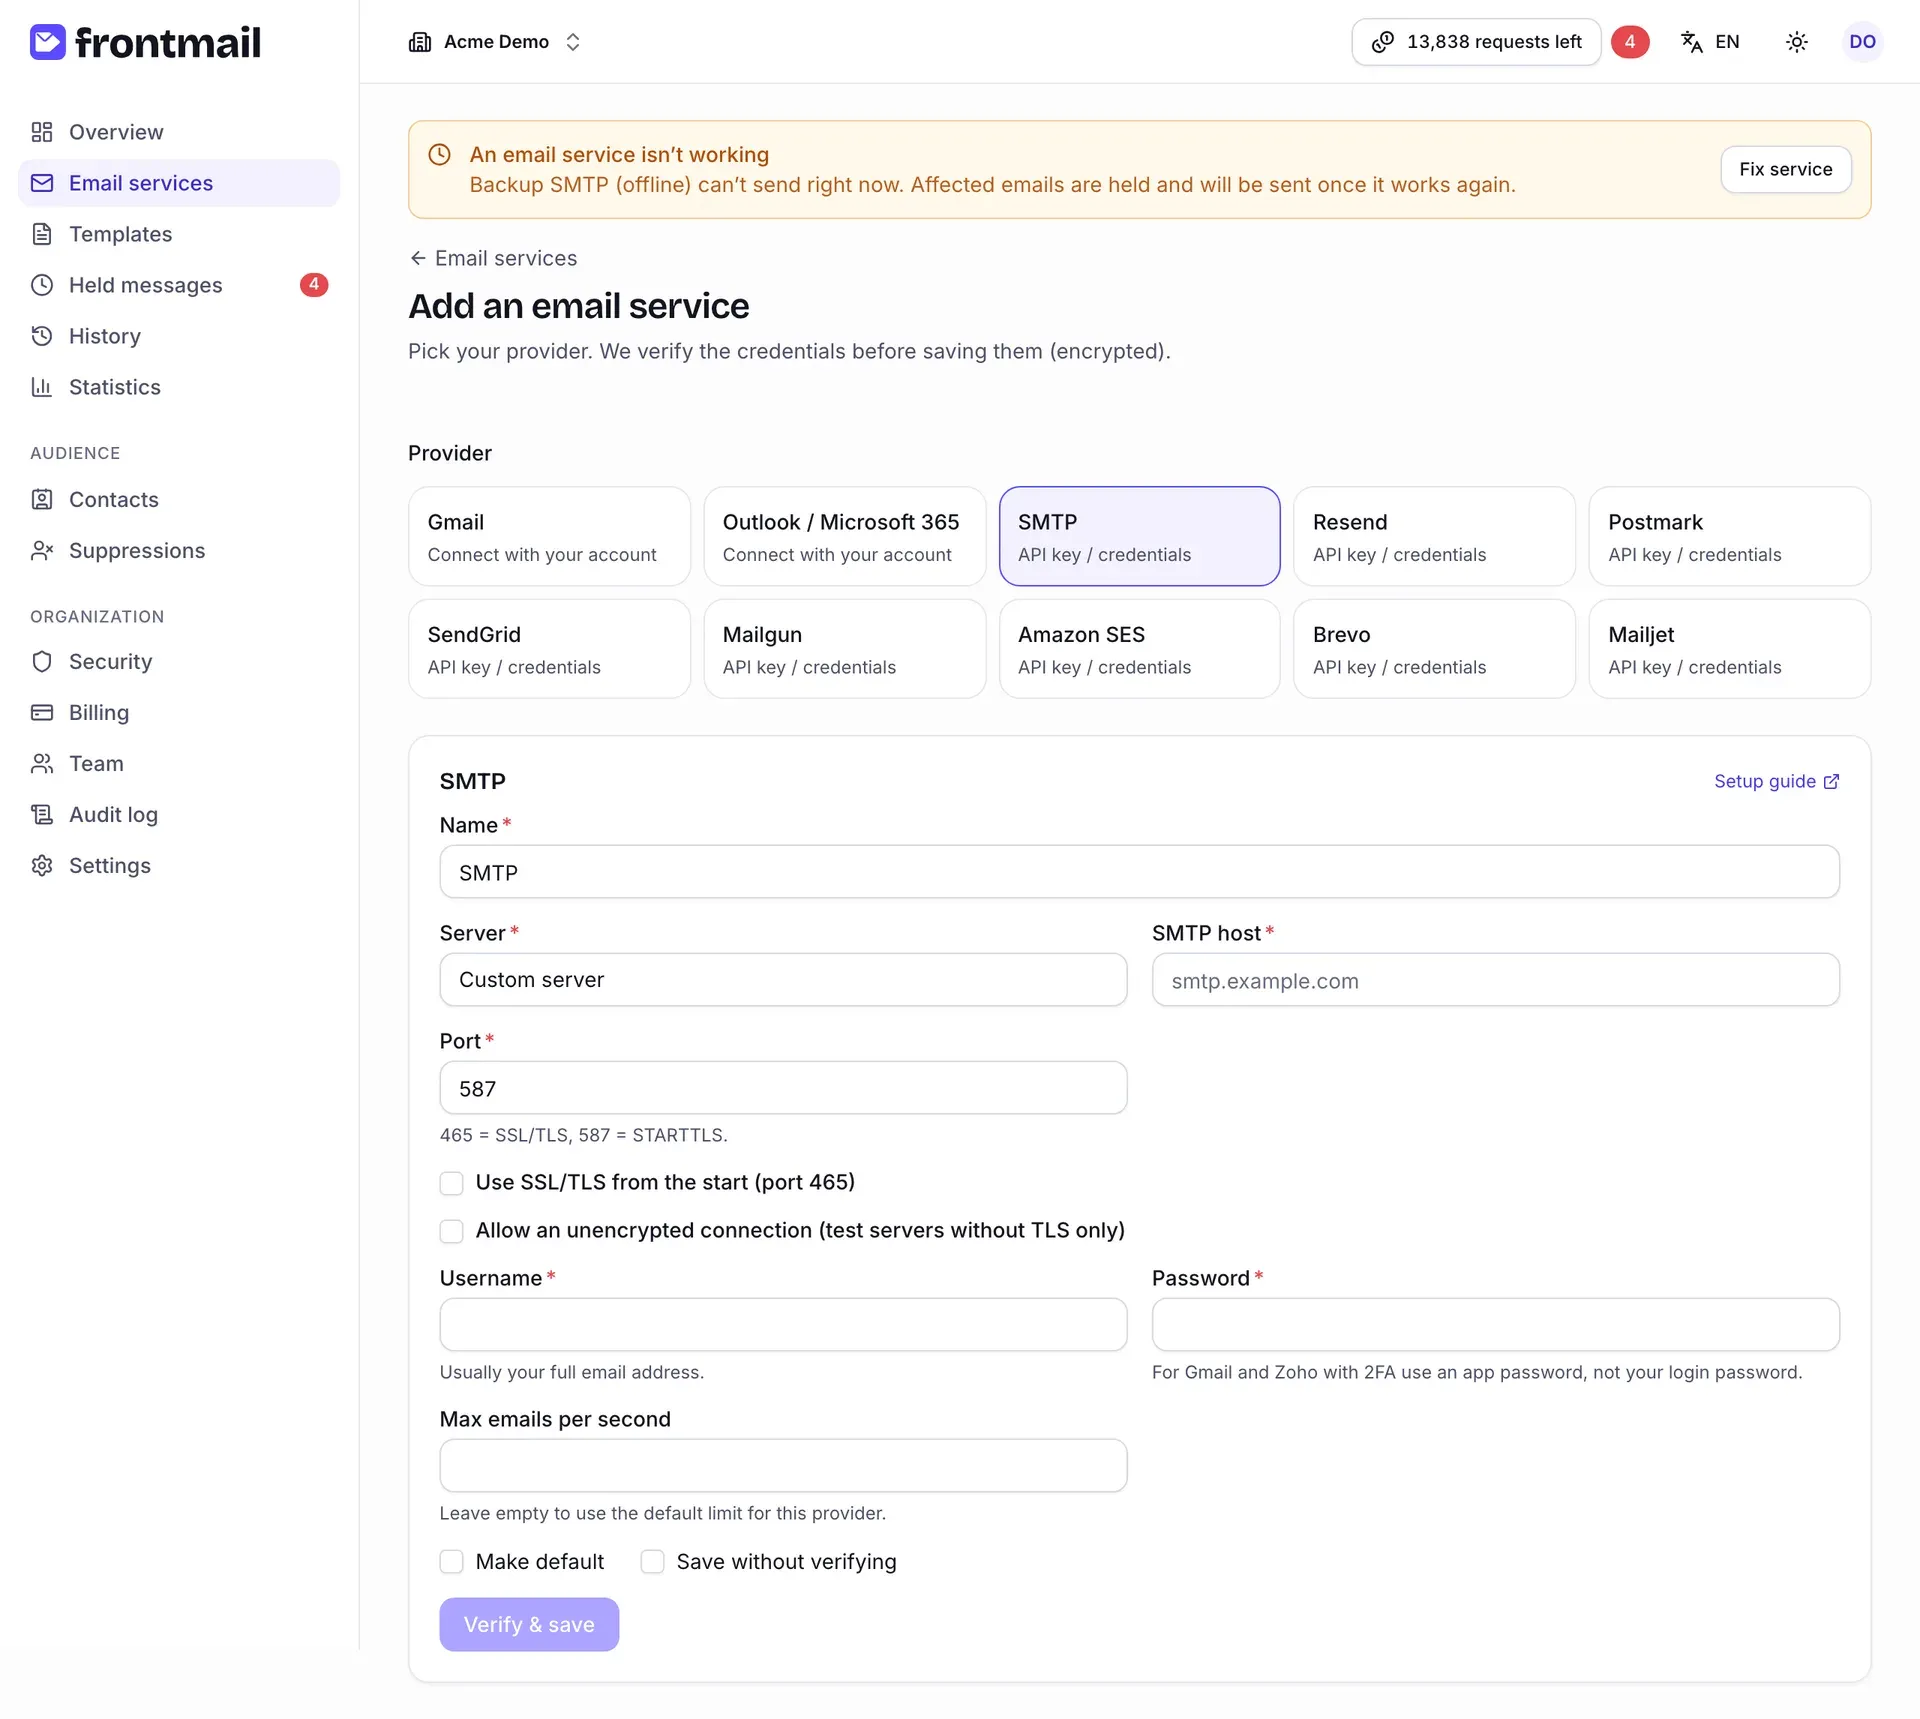
Each form has a Setup guide link in its top right corner. It opens the provider’s page in these docs – for example SMTP or Amazon SES – with where to find the credentials and which DNS records to set up.
Providers with credentials (SMTP and APIs)
Section titled “Providers with credentials (SMTP and APIs)”- Change the Name if you like – it’s what you’ll see in lists and in template settings.
- Fill in the provider’s fields (API key, region, host and port, …). Required fields are marked with an asterisk; the hints under the fields tell you what to enter.
- Tick Make default if templates without their own service should use this one.
- Click Verify & save.
Frontmail checks the credentials with the provider before saving them – no email is sent. If the provider refuses them, you see The provider rejected these credentials with the provider’s message, and nothing is saved. Fix the values and try again. For custom SMTP servers the message only says whether the login was rejected or the server couldn’t be reached (see SMTP – allowed servers). You can add at most 20 services per hour.
Save without verifying skips this check and saves the service as Not checked. Use it only when the provider can’t be reached from Frontmail right now; test the connection later.
Credentials are stored encrypted and are never shown again – when editing, secret fields stay empty.
Gmail and Outlook (OAuth)
Section titled “Gmail and Outlook (OAuth)”- Change the Name if you like.
- Click Connect Gmail (or Connect Outlook / Microsoft 365).
- Sign in at the provider and allow Frontmail to send email from your mailbox.
You come back to the service page with Service connected. The service is Healthy right away, and the sender address is set to the connected mailbox.
If connecting fails, you land on the service list with Connecting the account failed and one of these reasons:
| Message | What happened / what to do |
|---|---|
| The sign-in took too long or was opened in another browser. | The sign-in link expired or you finished it in a different browser or account. Start again from Add service. |
| You don’t have permission to add services. | Your role can’t add services. Ask an owner, admin or developer. |
| The provider didn’t confirm the connection. | The provider’s reply couldn’t be verified. Try again. |
| The provider didn’t grant offline access. | Frontmail needs a long-lived permission. Remove Frontmail from your account’s connected apps (Google or Microsoft account settings) and connect again. |
| Access was denied in the provider’s consent screen. | You (or your admin’s policy) declined the permission. Connect again and allow access. |
Gmail and Outlook have their own guides: Gmail, Outlook.
The service page
Section titled “The service page”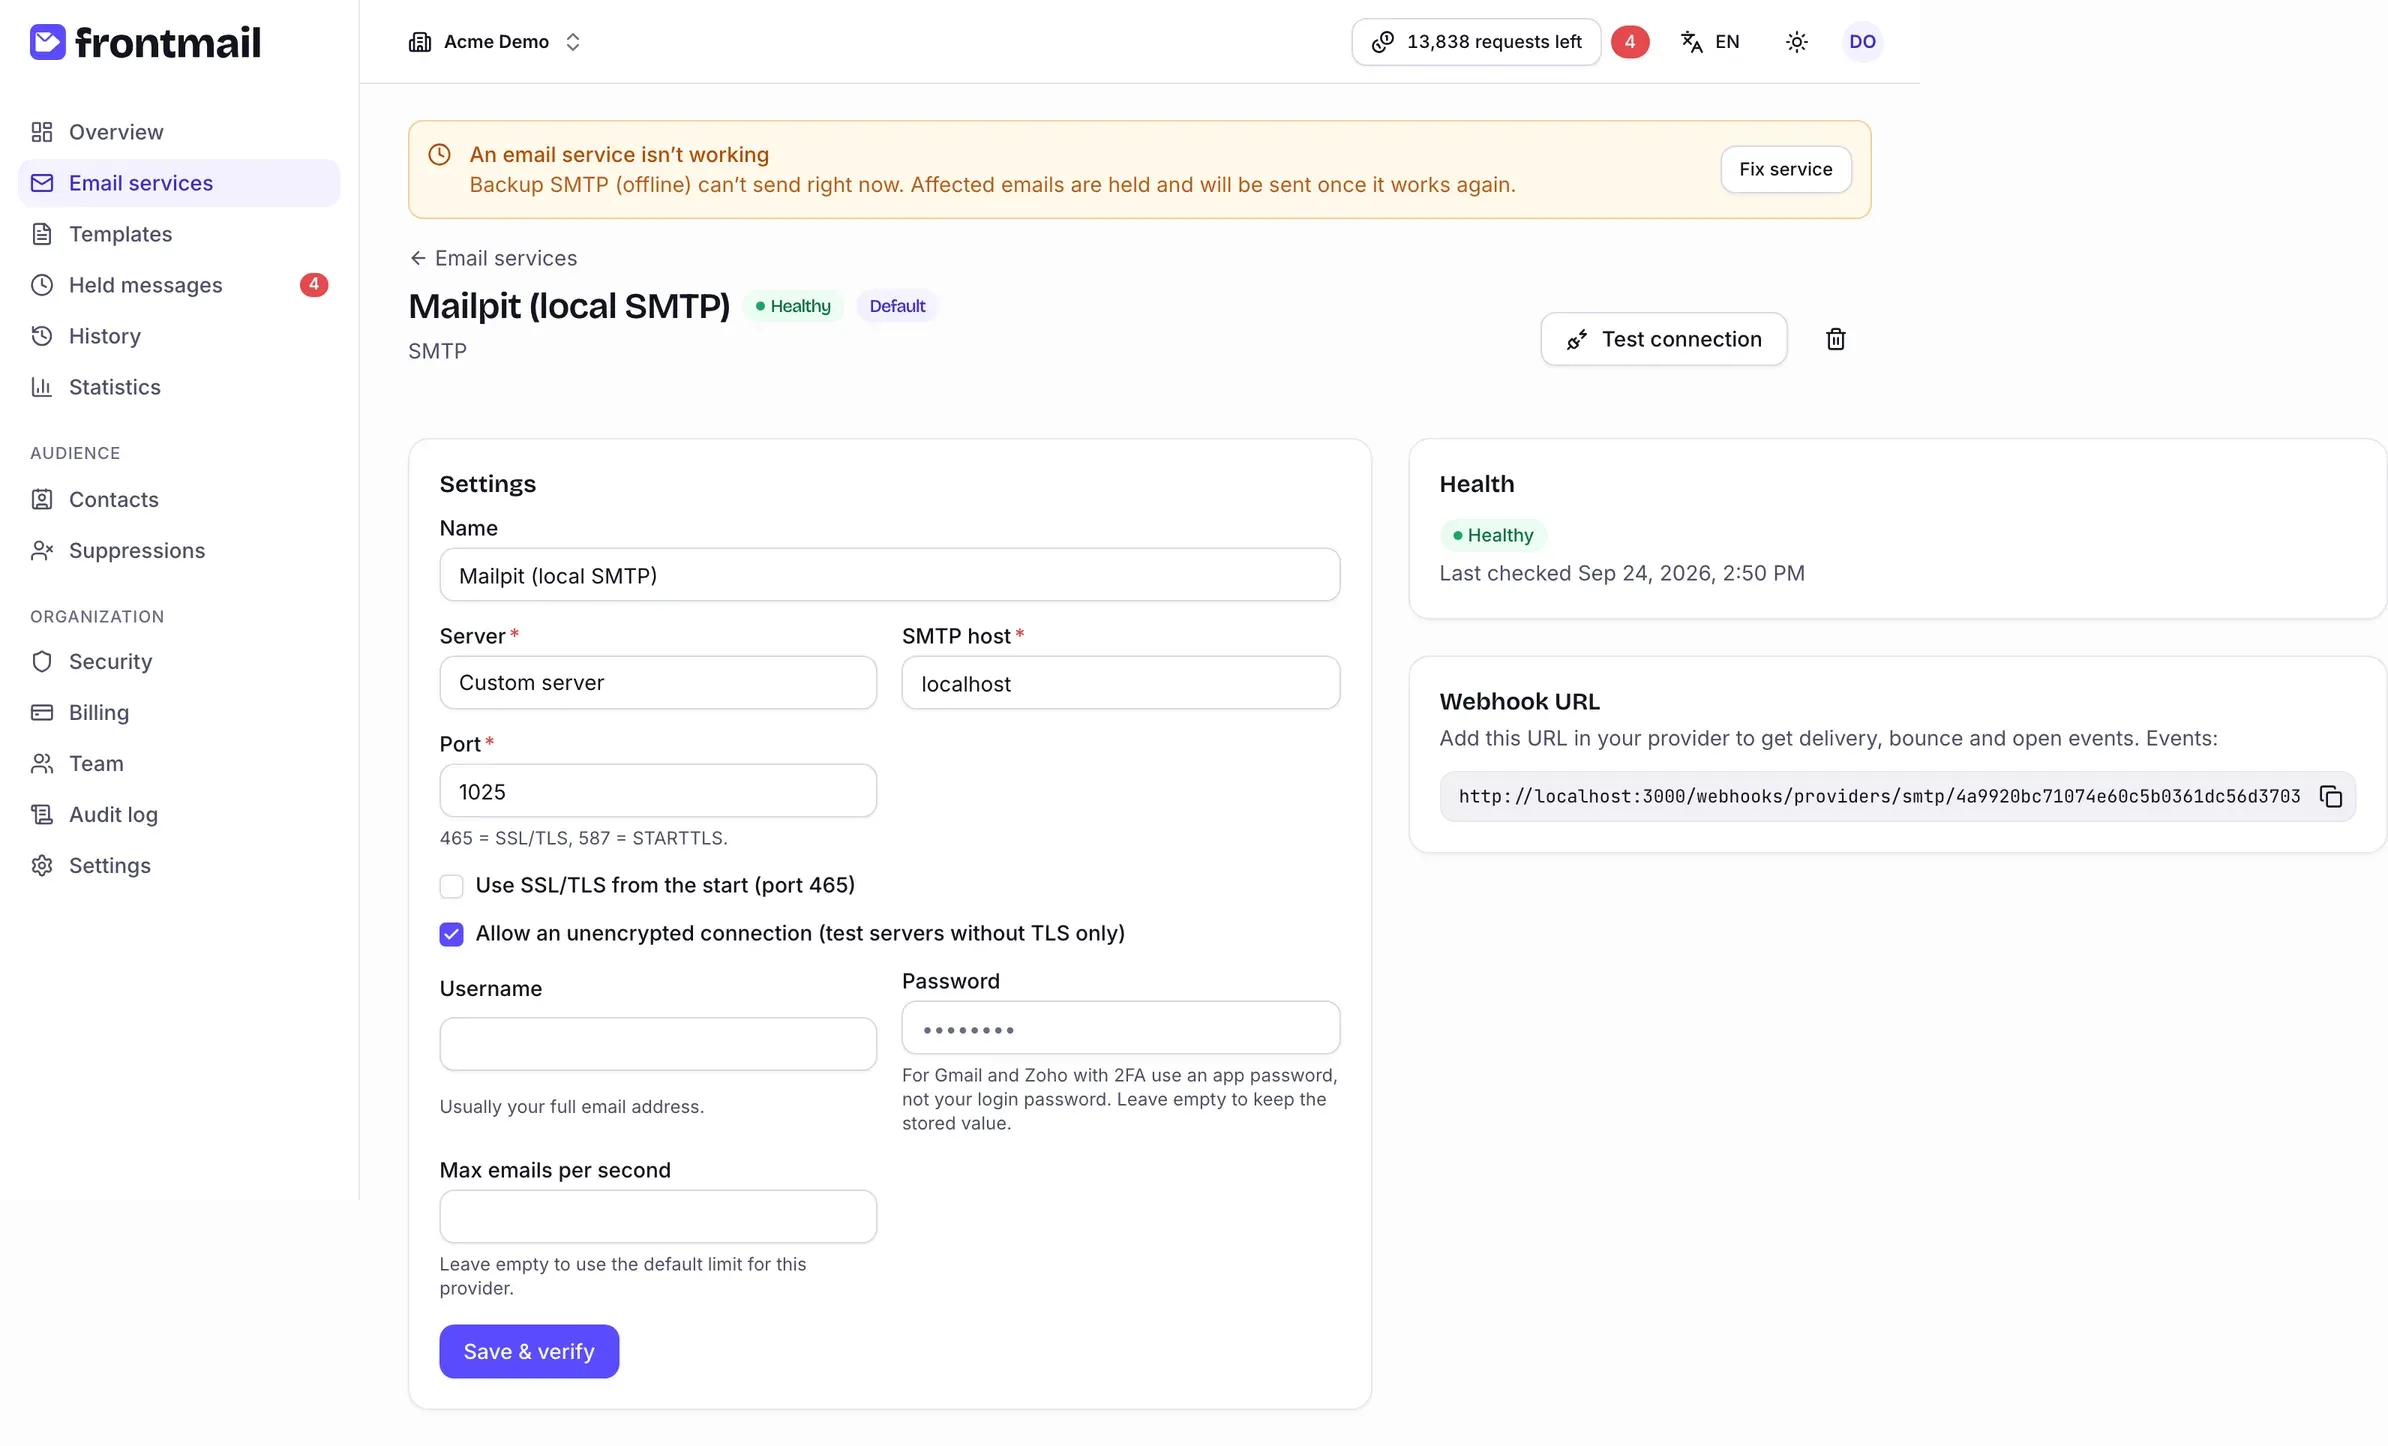
At the top you see the name, health badge, Default badge and the provider. The page has:
- Settings – the name and the provider’s fields (for credential-based providers), saved with Save & verify,
- Health – the current status and Last checked …,
- Webhook URL – the address your provider should send delivery events to (see below).
How to test the connection
Section titled “How to test the connection”Click Test connection. Frontmail verifies the credentials with the provider without sending an email and shows Connection works. or Connection failed with the provider’s error. The result updates the service’s health.
If the service was broken and the test succeeds, emails held because of it are released right away – the message tells you how many, e.g. 3 held emails released.
How to change credentials or settings
Section titled “How to change credentials or settings”- Edit the fields. Leave secret fields (passwords, API keys) empty to keep the stored value.
- Click Save & verify.
Frontmail verifies the connection before saving – just like when adding a service. If the provider refuses it, nothing is saved. A successful save also marks a broken service as healthy and releases its held emails.
How to make a service the default
Section titled “How to make a service the default”Click Make default on the service page (the button is hidden on the current default). The default service is used by every template whose Service setting is Default service, and by API calls that don’t name a service. Only one service can be the default.
Fallback services
Section titled “Fallback services”A fallback isn’t set on the service – you choose it per template, in the template’s Settings → Delivery → Fallback service. When the main service fails with an authentication or permanent error, the email is sent through the fallback instead. See Template editor and Fallback service.
How to set up the delivery webhook
Section titled “How to set up the delivery webhook”Without a webhook, a message ends in the sent status – the provider accepted it. To also see
delivered, bounces, spam complaints, opens and clicks in History and
Statistics:
- Copy the Webhook URL with the copy button.
- In your provider’s console, add it as a webhook / event notification URL.
- Enable the events listed in the card’s description (Events: …).
Treat the URL as a secret – it contains a token unique to this service. That’s why only roles that can manage services (owner, admin, developer) see it; viewers and billing members don’t. When someone who knew the URL leaves the team, click Generate new webhook URL: the old URL stops working immediately, so paste the new one into your provider’s webhook settings right away. Which events each provider sends is described in its guide and in Delivery webhooks. Personal mailboxes (SMTP, Gmail, Outlook) don’t send delivery events.
Health checks
Section titled “Health checks”A service is always in one of three states:
| Status | Meaning |
|---|---|
| Healthy | The last check (or the last send) worked. |
| Not working | The provider rejected the credentials or the connection. The error is shown in the list and on the service page. |
| Not checked | The service was saved without verifying and hasn’t been checked yet. |
Frontmail checks every service once a day, right after an authentication error while sending, and every time you save the service, reconnect it or click Test connection. The daily check ignores temporary problems (timeouts, provider outages, throttling) – they don’t mark a service as not working.
When a service stops working, owners and admins get an email and every page shows the An email service isn’t working banner.
When a service stops working
Section titled “When a service stops working”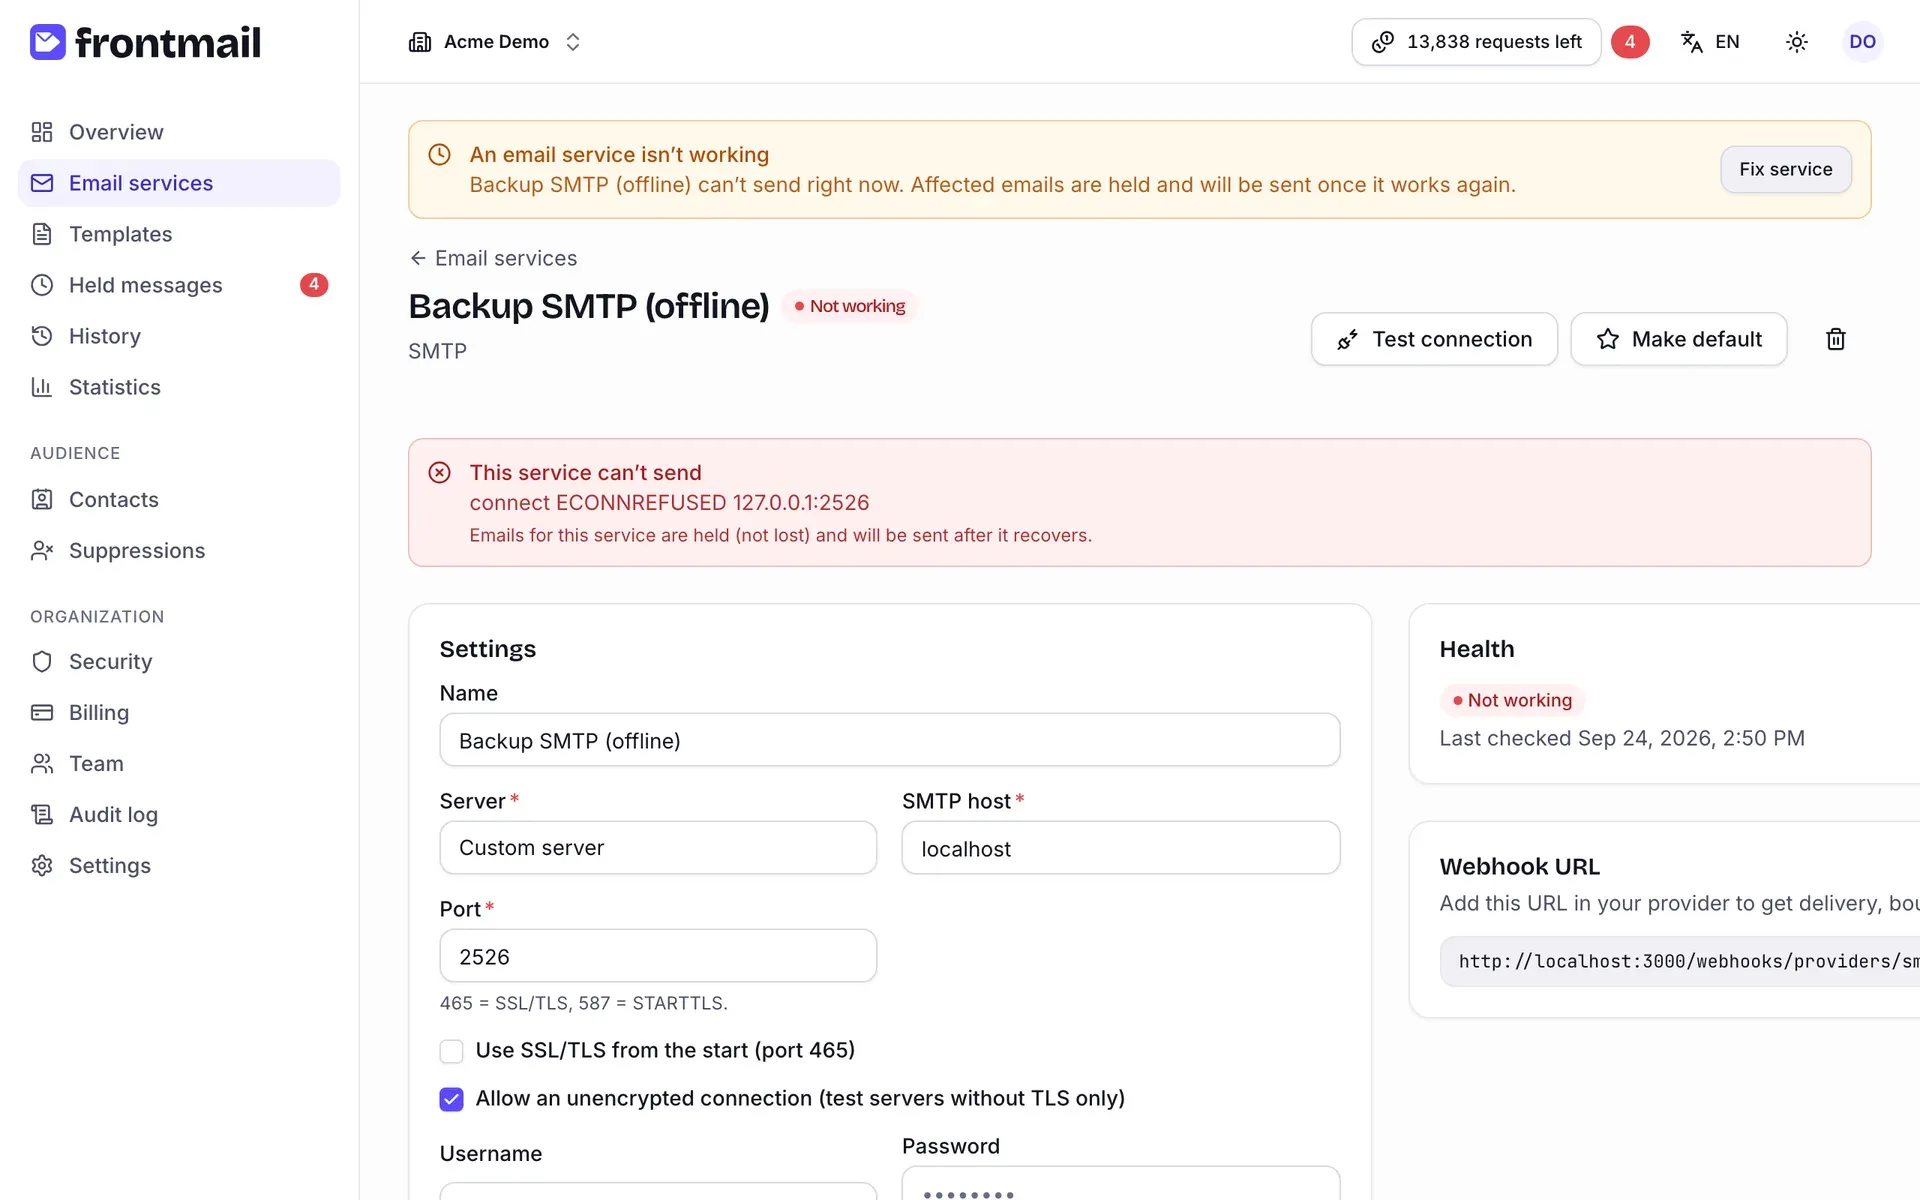
The service page shows This service can’t send with the provider’s error and the note that emails for this service are held, not lost.
Emails that fail on this service with an authentication error, and whose template has no working fallback, wait in Held messages with the reason Service error. Their credit is refunded while they wait.
To fix it:
- Click Fix service in the banner (or open the service from the list).
- Depending on the cause:
- Credentials – enter the new API key or password and click Save & verify.
- Gmail / Outlook – click Reconnect in the alert and allow access again. This is typical after a password change or when the provider revoked access.
- Anything else (for example a server that was down) – click Test connection once the provider works again.
- When the check succeeds, the service becomes Healthy and its held emails are sent automatically, oldest first. The daily check also releases them if the provider recovers on its own.
How to delete a service
Section titled “How to delete a service”- Open the service and click the trash icon.
- Confirm with Delete.
If templates still use the service (as their main or fallback service), Frontmail lists them – These templates use this service: … Deleting it switches them to your default service. Click Delete anyway to continue. Those templates will then send through your default service.
Emails already sent stay in History.