

Get started
After you sign up and verify your email address, Frontmail asks you to create an organization and then opens the Get started wizard: six short steps from an empty account to a form that sends email. You can skip any step and come back later.
If you prefer a longer walk-through with explanations, follow the tutorial.
Create your organization
Section titled “Create your organization”The Create your organization screen appears after your first sign-in, and whenever you choose New organization in the organization switcher.
- Enter the Organization name – your company or project, e.g. Acme Inc.
- Check the Billing country. It decides VAT and your billing currency (EUR in the EU, USD elsewhere).
- If the country is in the EU, you can enter your VAT ID. It’s optional; EU businesses with a valid VAT ID are invoiced without VAT (reverse charge).
- Under What will you send? pick Contact form, Transactional emails or Something else.
- Click Create organization.
The organization’s time zone is taken from your browser; you can change it later in Settings.
Your private key is shown once
Section titled “Your private key is shown once”Right after creating the organization, the Your organization is ready dialog shows your
Private key (sk_…).
- Click the copy button next to the key.
- Store it in your password manager or your server’s secret store.
- Click Continue to setup.
The dialog also confirms that you’re on the Free plan with 300 requests for this month. You can upgrade or buy credits any time in Billing.
If you picked a paid plan or a credit pack on the pricing page before signing up, the button says Continue to checkout or Continue to payment and takes you to Stripe first.
The setup wizard
Section titled “The setup wizard”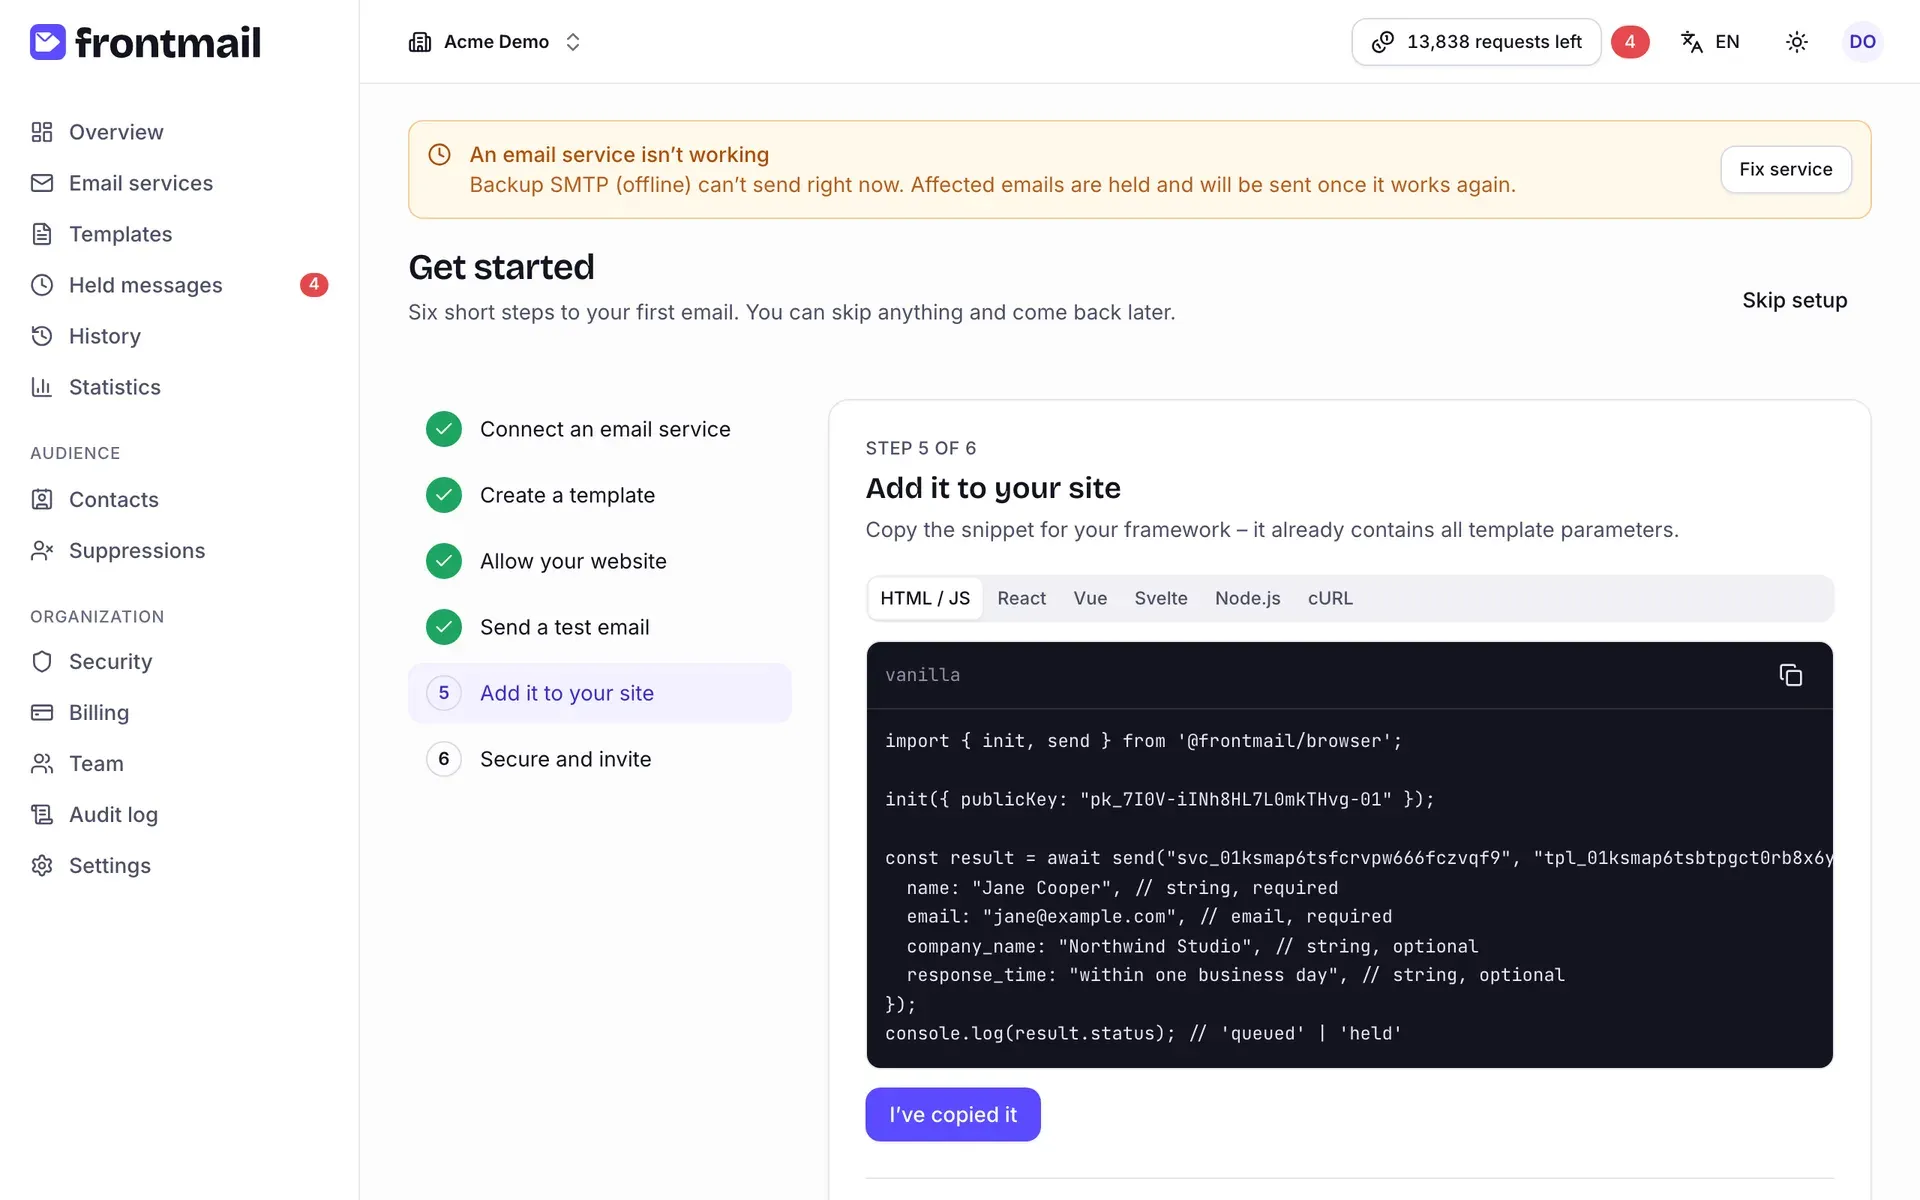
The list on the left shows all six steps; completed ones have a green check mark. Click any step to jump to it. The wizard always opens at the first step that isn’t done yet.
At the bottom of each step:
- Back – the previous step,
- Skip this step – move on without finishing it,
- Next – appears when the step is already done.
Skip setup in the top right hides the wizard and the setup card on Overview for good. Nothing you’ve already set up is undone.
1. Connect an email service
Section titled “1. Connect an email service”Frontmail sends through your own provider – Gmail, Outlook, SMTP or an API such as Postmark or Resend. Click Add service, choose the provider and save it; you come back to the wizard afterwards. Details: Email services.
Done when the organization has at least one service. Your first service automatically becomes the default one.
2. Create a template
Section titled “2. Create a template”- From gallery – pick a ready-made template (for example Contact form) and click Use template. You come back to the wizard.
- Start from scratch – opens Templates with the New template dialog.
Done when the organization has at least one template. See Template editor.
3. Allowed domains & bot protection
Section titled “3. Allowed domains & bot protection”Only listed domains can send with your public key.
- In Add domain enter the domain where your form lives, e.g.
example.com,*.example.comfor subdomains orlocalhost:3000for local development. - Click Save.
Domains that are already allowed are listed above the field. This step needs the Owner or Admin role; other roles see a note to ask one of them. More in Allowed origins.
The same step offers bot protection: paste the site key and secret key of your own free Cloudflare Turnstile widget (Cloudflare dashboard → Turnstile → Add widget with your website hostnames) and save them. You can then turn the CAPTCHA on for all templates in one click, and new templates have it on by default. This part is optional – you can skip it and add the keys later in Security → Bot protection (Turnstile), but we recommend it for public forms.
Done when at least one domain is allowed.
4. Send a test email
Section titled “4. Send a test email”- Choose the Template.
- Check Send to – it’s prefilled with your own address.
- Click Send test.
The email uses the template’s sample data. Test emails are free. If you have no template yet, the step asks you to create one first.
Done when you’ve sent at least one test email – from here or from the template editor.
5. Add it to your site
Section titled “5. Add it to your site”Pick your framework – HTML / JS, React, Vue, Svelte, React Native, Node.js or cURL – and copy the snippet. It already contains your public key, the service and template IDs and all template parameters with sample values. The wizard uses your first template; every template has the same snippets on its Snippets tab.
Done when you click I’ve copied it.
6. Secure and invite
Section titled “6. Secure and invite”- Set up two-step verification opens your account settings, where you can turn on two-step verification.
- Owners and admins can invite a colleague right here: enter the Email, choose the Role and click Send invite. See Team and roles.
Done when you click Finish setup, or automatically as soon as the organization has a second member or a pending invitation.
The setup card on Overview
Section titled “The setup card on Overview”Until all six steps are done (or you skip the setup), Overview shows the Finish setting up Frontmail card with your progress, e.g. 4 of 6 steps done, and a checklist of the steps. Click Continue setup to return to the wizard where you left off.